Introduction
What is it?
Git Patch Stack is a command line tool that facilitates a Patch Stack based workflow with Git.
It focuses on being platform-agnostic, hosting provider-agnostic, as well as supporting customization for a personal development experience.
I like to think of it as the Neovim of Patch Stack tools for Git. It provides a solid baseline set of functionality, around the concepts necessary for a Patch Stack workflow, while still facilitating the necessary customization to truly create a personal development experience.
Why use it?
Git Patch Stack helps you think in terms of a stack of patches instead of a series of isolated branches. This affords you the following benefits. First, you don’t have to think about branches. Second, it prevents you from being blocked by waiting on peer reviews.
This alone is a good start, and yes, it is probably better than what you were doing before. But to really make huge differences at an application architecture level and a software maintainability level you really need to adopt the methodology which will unlock benefits like the following.
- develop & ship software faster
- aligns with best practices for producing more maintainable software
- less mental overhead & complexity
- smaller, logical code changes, scoped to the application architecture
- more valuable peer reviews
- makes conflict resolution easier
- facilitates continuous integration while still support pre-commit code review
Patch Stack Workflow
The idea of the Patch Stack Workflow at a high level is simply that instead of managing code changes as isolated feature branches, you manage them as a stack of logical patches. This extends out through the peer review process as well. Probably the biggest difference in thinking is that we have to stop thinking in terms of branches or feature branches and start thinking in terms of a stack of logical code changes, a.k.a. patches.
No Branches
The Patch Stack Workflow doesn’t deal with branches. This is because there are a lot of downsides to branching. For example feature branches make valuable peer review very difficult if not impossible due to the amount of scope they include.
Feature branches also go against software maintainability & tooling best practices due to being scoped at the product level rather than the software architecture level. Beyond that they are designed strictly to isolate code changes away from each other. We have known for a long time now that delaying integration of software changes not only makes the integration process more difficult later on, but also prevents knowledge sharing and the natural evolution of an application architecture. For more details on this and where the concept of Patch Stack Workflows came from please see, Journey to Small Pull Requests.
This isn’t to say that branches are a horrible thing that should never be used. However, it is to say that we should be aware of the pros & cons of all our tools and processes, so we can use the ideal tools & processes for the job at hand.
Mental Model
In the Patch Stack Workflow instead of branches & commits we focus on a stack of patches.
A patch is simply a logical change to source code. From a technical standpoint a patch is simply a Git commit that exists on your patch stack. There are ideal characteristics that patches should strive to have. For example, being small, logical, build-able, testable, releasable, and having a good message. We will get into the specifics of these characteristics later and tools and techniques to help facilitate them.
A patch stack is what it sounds like, a stack of patches. Think of it like
a stack of papers. You can add new patches to the top of the stack, reorder the
patches in the stack, squash patches together, split a patch apart into
multiple patches or even drop patches you no longer want. These operations are
extremely useful for evolving patches. From a technical standpoint a patch
stack is the Git commit history on a remote tracking branch between the local
branches HEAD and the tracked remote branches HEAD. You can have as many
patch stacks as you like, however generally you work off of main as your
primary patch stack.
Once you have iterated on a patch to the point where you feel it is ready for review you naturally request review of that patch. Let’s say you get some good feedback as part of that review. Therefore you make some more changes to the patch using the operations from above. Then you simply request review of the updated patch.
After receiving a final review with an approval, you likely want to share that patch with the rest of your team. This is done by integrating the patch. From a technical standpoint integrating is pushing the particular patch up to the upstream of your patch stack.
The Patch Stack Workflow enables you to focus on creating, evolving, reviewing, and integrating patches which aids with creating code changes that are easy to review, aligned with the application architecture, scoped logically, facilitate efficient development, and support long term software maintainability.
Command Line Interface
The Git Patch Stack command line interface is an extension of Git designed to make creating & managing your stacks of patches throughout the development and review lifecycle as easy as possible. It does this by facilitating actions that make sense within the context of the Patch Stack Workflow rather than the concepts & operations of tools like GitHub, Bitbucket, or Gitlab.
Design Principles
As we started to define Git Patch Stack as a tool we used the following design principles as guiding lights to help constrain and shape it.
- streamline working within the Patch Stack Workflow and working with Git in general
- work with existing de facto peer review tooling
- support stepping outside of Git Patch Stack and back into Git
- facilitate the Continuous Integration Methodology while supporting pre-commit peer review
- platform-agnostic
- hosting provider-agnostic
- customizable for a personal development experience
These design principles are the key to Git Patch Stack being such an amazing tool.
Streamline working within the conceptual model
Other tools exist that, to some degree, facilitate working within the mental model of a stack of patches. However, using them generally feels like more work than what you normally experience with Git itself. To prevent this we have chosen this design principle to make sure that working in the Patch Stack Workflow would not feel like overhead, but also feel even more streamlined than a normal Git workflow.
Work with existing de facto peer review tools
One of the biggest driving forces for Git Patch Stack was that we wanted a way to work within the Patch Stack Workflow without having to switch wholesale to a separate code hosting and peer review provider, e.g. Phabricator. Therefore, we applied the constraint that it must support de facto peer review tools that people are used to working with, e.g. GitHub, Bitbucket, GitLab, Email, etc. Having this requirement also makes it possible for Git Patch Stack to be used even in environments where a portion of the team is using Feature Branches.
Support stepping outside of Git Patch Stack
Another crucial design principle we follow is that we never want Git Patch Stack to lock you in such that you can only use it. We want you to easily be able to work inside the Patch Stack Workflow but if you need for some reason to step out of that mental model and use Git itself, Git Patch Stack should make that trivial.
Facilitate the Continuous Integration Methodology
We have also chosen the requirement that we must support the Continuous Integration Methodology as closely as possible while still supporting a pre-commit peer review, as that is what the majority of developers are used to. The thinking is that this requirement will help us bring developers as close to 100% pure Continuous Integration but supporting the peer review process that everyone is used to.
Note: It is important to recognize that we are talking strictly about the Methodology of Continuous Integration and not simply having a continuous integration server setup running automated tests. Many people don’t even realize that Continuous Integration is and was a Methodology and that the running of automated tests was only a very small portion of it.
Platform Agnostic
Another requirement we have chosen to focus on is being platform-agnostic. This will allow developers in all different situations to be able to use Git Patch Stack. It shouldn’t matter if you are on macOS, a Linux distribution, or Windows.
Hosting Provider Agnostic
Beyond that we have also decided to focus on being hosting provider-agnostic. This means we will design Git Patch Stack so that it can work with any hosting provider even for its support for the peer review process. It is of course possible some providers might not facilitate any integration. If that is the case there isn’t much we can do. But this design choice will make it so that if it is possible to integrate with the provider it will be possible to use Git Patch Stack with them.
Customizable for a Personal Development Experience
Last but not least we are big believers in the concept of Personal Development Environments and have a personalized development experience customized just to your liking. Therefore, we have chosen to design Git Patch Stack around this concept so that you can easily make it part of your personal development experience.
Installation
As Git Patch Stack is written in Rust it can be compiled and installed on many different platforms. Currently, we provide package management via Homebrew on macOS and Cargo on all platforms. If you don’t like either of those package managers you will have to follow the Build from Source instructions below.
Install on macOS via Homebrew
To install on macOS we provide a Homebrew tap which provides the
git-ps-rs formula. To use it first you need to add the tap as follows.
brew tap drewdeponte/oss git://git.drewdeponte.com/homebrew-oss.git
This basically registers our tap as another source for packages for your Homebrew. Enabling you to do things like install the Git Patch Stack command line tool as follows.
brew install drewdeponte/oss/git-ps-rs
Because you have registered the tap you can also do useful things like upgrade your version of the Git Patch Stack command line tool as follows.
brew update
brew upgrade git-ps-rs
zsh & bash Completions
Our Homebrew formula installs the zsh & bash completion scripts into the
standard Homebrew shell completions location. So you just need to make sure
that path is configured in your shell configuration. For zsh it is generally
something like the following:
# add the Homebrew zsh completion scripts folder so it will be searched
fpath=(/opt/homebrew/share/zsh/site-functions/ $fpath)
# enable completion in zsh
autoload -Uz compinit
compinit
Install on all platforms via Cargo
To install the Git Patch Stack command line tool via Cargo simply run the following command.
cargo add gps
Build from Source
If you don’t like either package manager or you just want to build from source don’t fret. You will just have to make sure you have the following build dependencies installed.
- Rust (macOS:
brew install rust)
Once you have the build dependencies installed all you should need to do is run the following command to build the release version of the command line tool.
cargo build --release
Once you have built it successfully you can use the mv command to move the
target/release/gps file into /usr/local/bin/ or some other location in your
PATH environment variable.
zsh & bash completions
The zsh and bash completion scripts are generated as part of the build
process by Cargo’s custom build script, build.rs at the root of the
project.
The scripts are output to the Cargo -
OUT_DIR
location, generally target/release/build/gps-*/out where the * is a hash
value. The files are named as follows.
gps.bash- bash completion script_gps- zsh completion script
Simply move the files to whatever location on your system you are sourcing for completion scripts.
Hooks
Git Patch Stack takes the stance that it shouldn’t be bound to a specific source control management platform (GitHub, Bitbucket, GitLab, etc.) or a particular request review process. Even across projects.
To give our users this flexibility we have created a hooks system for a
number of the commands, e.g. the request-review and isolate commands. This
allows the users to configure & customize what these commands do.
A hook is simply an executable file (script, binary, etc.) that is named according to the particular hook name and located in one of the three general locations for hooks.
.git-ps/hooks/- communal repository specific hooks.git/git-ps/hooks/- personal repository specific hooks~/.config/git-ps/hooks/- personal user global hooks
Communal repository specific hooks are searched first, if not found then it is followed by searching the personal repository specific hooks, and if not found then it searches in the user’s global hooks. This allows a team to standardize certain hooks across the repository using the communal repository specific hooks as well configure personalized hooks in their personal repository specific hooks or general sane default hooks in their user global hooks.
The following is a list of currently supported hooks and their expected filenames.
request_review_post_sync- hook executed byrequest-reviewcommand after successfully syncing the patch to remote - generally used to create a pull request / patch email & send it - Note: This hook is required to be able to use therequest-reviewcommand.isolate_post_checkout- hook executed byisolatecommand after successfully creating the temporary branch, cherry-picking the patch to it, and checking the branch outisolate_post_cleanup- hook executed byisolatecommand after doing its cleanup, checking out stack you were on prior to isolate and deleting theps/tmp/isolatebranch. The isolate cleanup process is triggered automatically when run viarequest-revieworintegratecommands but can also be triggered by runninggps isolatewith no patch index.integrate_verify- hook executed byintegratecommand after checking to make sure patches match between stack and remote, when not forced with--force/-f. This is often used to make sure the associated CI checks have passed.integrate_post_push- hook executed byintegratecommand after successfully pushing the patch up to the patch stacks upstream remote. This is especially useful when you need to run something after a patch has been successfully integrated but before cleanup.list_additional_information- hook executed bylistcommand for each patch in the stack. Adds a column with the output of the hook script. Could be used, for example, to add information from the remote (for example, PR status on GitHub).
You can find examples of hooks that you can straight up use or just use as a
starting point in example_hooks within the repository.
Get Started with Hooks
To get started with hooks lets set up the request_review_post_sync hook using
the super basic GitHub CLI implementation that handles creating the pull
request for you as part of the request-review command.
Get the example hooks by cloning the repository.
git clone git://git.drewdeponte.com/git-ps-rs.git
To start we need to make sure that the Global Hook Directory is created with the following:
mkdir -p ~/.config/git-ps/hooks
Then we need to copy the example hook of your choice to the Global Hooks Directory and give it execute permissions. This can be done with the following.
cp ~/code/git-ps-rs/example_hooks/request_review_post_sync.sample.github-cli ~/.config/git-ps/hooks/request_review_post_sync
chmod u+x ~/.config/git-ps/hooks/request_review_post_sync
This hook uses the GitHub CLI to interface with GitHub and create the pull requests. In order for this to work we need to make sure that we have the GitHub CLI installed and makes sure that we have authenticated it. This can be done as follows no macOS.
brew install gh
gh auth login
Once you have set up the hook as described above and installed the GitHub CLI
and authenticated with it to GitHub. You should be all set. When you run the
request-review it should use the hook to create a pull request of the patch.
Configuration
Git Patch Stack supports various settings via three layers of configuration files.
- personal global settings -
~/.config/git-ps/config.toml- intended to allow you to define default personal settings for when a repository doesn’t specify a setting - personal repository settings -
repo_root/.git/git-ps/config.toml- intended to allow you to define personal settings constrained to a repository. Note: Settings defined in here override any values defined in the personal global settings. - communal repository settings -
repo_root/.git-ps/config.tomlintended to allow a team to enforce settings for everyone working on a repository. Note: Settings defined in here override any values defined in the personal repository settings or in the personal global settings.
The following is an example of a config defining all of the settings. All sections and settings are optional so you don’t need to specify them all in each config.
[pull]
show_list_post_pull = false

[request_review]
verify_isolation = true

[integrate]
verify_isolation = true
prompt_for_reassurance = true
pull_after_integrate = false

[fetch]
show_upstream_patches_after_fetch = true

[branch]
verify_isolation = true
push_to_remote = false

[list]
add_extra_patch_info = false
extra_patch_info_length = 10
reverse_order = false
alternate_patch_series_colors = true
# patch_background.color # default No Color so have commented out
patch_background.alternate_color.RGB = [58, 58, 58]
patch_foreground.color.RGB = [248, 153, 95]
#patch_foreground.alternate_color # default No Color so have commented out
patch_index.color.RGB = [237, 199, 99]
# patch_index.alternate_color # default No Color so have commented out
patch_sha.color.RGB = [157, 208, 108]
# patch_sha.alternate_color # default No Color so have commented out
# patch_summary.color # default No Color so have commented out
# patch_summary.alternate_color # default No Color so have commented out
patch_extra_info.color.RGB = [109, 202, 231]
# patch_extra_info.alternate_color # default No Color so have commented out
The following is a breakdown of the supported settings.
pull.show_list_post_pull- (true/false default: false) - controls whether thepullcommand will show the patch list after successfully pullingrequest_review.verify_isolation- (true/false default: true) - if true therequest-reviewcommand will run theisolatecommand & it’s hooks to verify the patch is isolated prior to requesting review. If the isolation verification fails it errors preventing you from requesting review.integrate.verify_isolation- (true/false default: true) - if true theintegratecommand will run theisolatecommand & it’s hooks to verify the patch is isolated prior to integrating it. If the isolation verification fails it errors preventing you from integrating the patch.integrate.prompt_for_reassurance- (true/false default: true) - if true theintegratecommand will present the user with the patch details and prompt the user asking them if they are sure they want to integrate the patch. If they say yes, then it moves on the with integration. If not it aborts the integration.integrate.pull_after_integrate- (true/false default: false) - if true theintegratecommand willpullafter a successful integration.fetch.show_upstream_patches_after_fetch- (true/false default: true) - if true thefetchcommand will show the upstream patches that were fetched.branch.verify_isolation- (true/false default: true) - if true thebranchcommand will run theisolatecommand & it’s hooks to verify the patch(es) are isolated prior to creating and possibly pushing the branch. If the isolation verification fails it errors preventing you from creating the branch.branch.push_to_remote- (true/false default: false) - if true thebranchcommand will push the branch to the remote with the same name automatically. If false it will only create the local branch.list.add_extra_patch_info- (true/false default: false) - if true thelistcommand will include extra patch information from thelist_additional_infohook. See Hooks for more details.list.extra_patch_info_length- (integer default: 10) - the width of the additional information column in the output ofgps list. If the output is longer it will get truncated. See Hooks for more details.list.reverse_order- (true/false default: false) - if set to true it will reverse the order in whichgps listpresents the patches in the stack. Some people use this option to make the patch order match the order patches are presented within interactive rebases.list.alternate_patch_series_colors- (true/false default: true) - if set to true it will alternate the colors of the patches using the configured alternate colors when listing out the patches withgps list.list.patch_background.color.RGB- (default: No Color) an RGB value (e.g.[58, 58, 58]) specifying the color to use for a patches background in thegps listoutput. To have No Color simply don’t specify the config in your configuration file.list.patch_background.alternate_color.RGB- (default:[58, 58, 58]) an RGB value (e.g.[58, 58, 58]) specifying the color to use for a patches alternate background in thegps listoutput. This is used when thelist.alternate_patch_series_colorsoption is enabled.list.patch_foreground.color.RGB- (default:[248, 153, 95]) an RGB value (e.g.[58, 58, 58]) specifying the color to use for a patches foreground in thegps listoutput.list.patch_foreground.alternate_color.RGB- (default: No Color) an RGB value (e.g.[58, 58, 58]) specifying the color to use for a patches alternate foreground color in thegps listoutput. This is used when thelist.alternate_patch_series_colorsoption is enabled. To have No Color simply don’t specify the config in your configuration file.list.patch_index.color.RGB- (default:[237, 199, 99]) an RGB value (e.g.[58, 58, 58]) specifying the color to use for a patches index in thegps listoutput.list.patch_index.alternate_color.RGB- (default: No Color) an RGB value (e.g.[58, 58, 58]) specifying the color to use for a patches alternate patch index color in thegps listoutput. This is used when thelist.alternate_patch_series_colorsoption is enabled. To have No Color simply don’t specify the config in your configuration file.list.patch_sha.color.RGB- (default:[157, 208, 108]) an RGB value (e.g.[58, 58, 58]) specifying the color to use for a patches sha in thegps listoutput.list.patch_sha.alternate_color.RGB- (default: No Color) an RGB value (e.g.[58, 58, 58]) specifying the color to use for a patches alternate sha color in thegps listoutput. This is used when thelist.alternate_patch_series_colorsoption is enabled. To have No Color simply don’t specify the config in your configuration file.list.patch_sha.color.RGB- (default: No Color) an RGB value (e.g.[58, 58, 58]) specifying the color to use for a patches summary in thegps listoutput. To have No Color simply don’t specify the config in your configuration file.list.patch_sha.alternate_color.RGB- (default: No Color) an RGB value (e.g.[58, 58, 58]) specifying the color to use for a patches alternate summary color in thegps listoutput. This is used when thelist.alternate_patch_series_colorsoption is enabled. To have No Color simply don’t specify the config in your configuration file.list.patch_extra_info.color.RGB- (default:[109, 202, 231]) an RGB value (e.g.[58, 58, 58]) specifying the color to use for a patches extra info in thegps listoutput.list.patch_extra_info.alternate_color.RGB- (default: No Color) an RGB value (e.g.[58, 58, 58]) specifying the color to use for a patches alternate extra info color in thegps listoutput. This is used when thelist.alternate_patch_series_colorsoption is enabled. To have No Color simply don’t specify the config in your configuration file.
Colors
All color and alternate_color config options can be set either with
RGB values as follows.
patch_index.color.RGB = [255, 232, 18]
patch_index.alternate_color.RGB = [15, 30, 50]
Or with color names.
patch_index.color = "White"
patch_index.alternate_color = "Blue"
Basic Usage
The basic usage pattern for Git Patch Stack is pretty straight forward and is outlined as follows.
- add one or more WIP patch(es) to your stack
- iterate and evolve a patch to a state where it is ready to be reviewed
- request review of the patch
- rinse and repeat steps 2 & 3 until that patch is approved
- integrate the patch
Add one or more WIP patch(es) to you stack
The first step is to add a WIP, Work In Progress, patch to your stack. This is effectively a patch that is incomplete in its nature with a summary prefixed with “WIP:”.
This is done simply by making some local changes, staging them with git add,
and then create a patch (a.k.a. commit) with git commit. It will take the
staged changes and create a patch on top of your stack.
Iterate and evolve a patch to a state where it is ready to be reviewed
The second step is to iterate the WIP patch using various commands like git commit --amend, gps rebase, etc. to get it to a place where it is ready to
review. At this point you remove the “WIP:” prefix from the patches summary.
Request review of the patch
Then you request review of the patch with gps rr or gps request-review if
you would like it to be reviewed by a peer. This requests review of the
specified patch using provided hook. This most likely is creating
a pull request on GitHub, Bitbucket, or GitLab. But it could also be creating &
sending an email to a mailing list, or submitting your patch to any other peer
review process.
Rinse and Repeat until approved
Once you have requested review of the patch you wait for feedback and make any
necessary changes using the same commands as when iterating on it before. Once
you feel it is, once again, ready to be reviewed you simply request review for
the patch again using gps rr or gps request-review. You continue this
process until you have addressed all the issues and the patch has been
approved.
Integrate the patch
Once the patch has been approved you are ready to integrate it upstream so that
the rest of the team can continue building on it. This is done with the gps int or gps integrate command.
Once you have integrated your patch in. You do it all over again with another patch.
Command Docs
The Git Patch Stack command line tool has integrated help for the command itself as well as all of it’s subcommands.
You can get a full breakdown of all the commands by running
gps --help
You can also get detailed help about specific commands by use the --help
switch with the command. Example:
gps request-review --help
Man Pages
We also provide man pages for the Git Patch Stack command line tool as well.
They can be accessed as follows:
man gps-add
Note: The man pages are still a work in progress so there may not be the man
page you are looking for. If that is the case, no worries. Just fall back to
using the integrated --help switch for the subcommand you are interested in.
Stuck on Feature Branches
Sometimes you are in a situation where you are stuck with Feature Branches. This could be because your team hasn’t made the glorious switch over to Git Patch Stack yet. Or it could be you are dropping in as a consultant to help a team out with something. Or maybe you are working on a team that has a bunch of automation setup already around the use of Feature Branches.
Whatever your situation, don’t fret! Git Patch Stack is designed such that you can use it locally and still get a lot of the benefits even if you are stuck in the world of Feature Branches.
Build up Patch Series
The big difference between the normal workflow and this one is simply that you don’t request review of the individual patches as soon as you finalize them. Instead, you build up a series of finalized patches in the correct order within in your patch stack. Then you effectively request review of the series of patches.
This sadly means you don’t get the benefits of near continuous integration. However, all is not lost. If you use Git Patch Stack locally and follow the best practices and methodology around creating small logical patches. You will end up with a well-defined series of patches that will stand as a logical “proof of work” for your feature. Beyond that those logical patches will be invaluable later on as part of the Git history.
Request Review of Series
Once you have built up your patch series of finalized patches. We need to request review of that patch series. The most direct process to do this with Git Patch Stack is the following.
- build up your series of finalized patches in your stack
- request review of the patch series - e.g.
gps rr 1-3
Note: The gps request-review command allows you to pass the -n your-branch-name switch to it if you want to control the name of the branch
created.
Deal with Feedback
Often times you will get feedback on your Pull Request when it is reviewed. You can address this using the following.
- update the patches in your patch stack to address the feedback
- re-request review of the patch series - e.g.
gps rr 1-3 - comment on the Pull Request letting the reviewer know what changes you have addressed and that they have been pushed up
Change is Hard
We understand that Change is Hard. Especially changing conceptual models and ways of thinking that you might be used to. That is why we designed Git Patch Stack to be something that you can adopt in stages. For example it is designed in such a way that you can easily use the Git Patch Stack command line tool to start getting comfortable with the tool and the process without ever knowing anything about the Methodology or the best practices.
Stage 1
An example of this might be that you use gps to create patches, iterate on
patches, request review of patches and integrate them. But you continue to make
large patches. This seems to be how some people prefer to start. We can
consider this Stage 1 for lack of a better name.
Obviously when doing this you would be missing out on all the benefits that the Methodology provides in addition to the core benefits that the tool provides. It is worth noting that the benefits the Methodology provides are quite significant.
Stage 2
Maybe at this point you are starting to naturally break changes up into smaller patches and you have run into the concept of dependent patches. Therefore you have done some reading in our docs on Dependent Patches, the types of dependencies and the various techniques you can apply to avoid the dependencies.
This gains you even more of the benefits but still leaves you shy of a significant chunk of benefits tied to the Methodology.
Stage 3
Hopefully after living in Stage 2 for a while you have seen more value and realize that there is an extremely valuable Methodology out there that can help you understand how best to think through breaking down a problem into small logical ideally independent patches. So you read the documentation around the Methodology and start applying the practices to your work with Git Patch Stack unlocking it’s full potential.
The Other Way Around
Everyone is clearly different, and how people learn and adopt things is also different. Therefore others may find it makes more sense to learn about the Methodology first and then start working with the Tool. So don’t feel obligated to following these three stages.
Patch Stack Identifier
What is it?
The Patch Stack ID or ps-id is simply a Globally Unique Identifier (GUID) that
is added to the commit message of a commit when a commit is cherry picked into
a patch stack managed branch. Most commonly this occurs with the gps branch,
gps request-review, and gps integrate commands.
What is it used for?
When you cherry-pick or rebase you end up with a commit that has a different sha. So we can’t use the sha to represent a patch because it changes on us. So instead we use this ps-id which stays the same across cherry-picks and rebases. This allows us to identify that two or more commits represent the same conceptual patch even though the commit SHAs are different. This in turn empowers Git Patch Stack to be able to tell that changes have been made to a patch in one place but not another, etc.
Picking a ps-id when squashing
When you are rebasing and squashing a patch into another patch you may notice in the commit message you will have two ps-id values if you are squashing two patches that have already been associated with a branch. A patch should conceptually only have one identifier. So which one should you pick? Well it depends. You need to decide which patch most accurately represents the concept of the patch going forward and to use that one and get rid of the other one. If it isn’t clear in a particular case. You can simply pick one and the branch that was already tied to that patch will be the branch that is used.
What happens to ps-id when fixing up?
When you fixup a commit into another commit the commit being fixed up will lose its commit message and along with it any ps-id it may have had. This is ok because when you are fixing up the commit that is be fixed up into is effectively absorbing the other commit. So you will be left with its ps-id at the end which is conceptually what you would want anyway.
Can we hide it so that out commit messages are clean?
No not really. There have been discussions on using git notes to track them but I believe they are tied to the sha. Also I believe I heard they are on the way out. If we didn’t have the ps-id we would lose the ability to identify that various commits are all just different states of the same patch. We would also lose the ability to know the branches associated with a patch. So no we can’t hide it from the commit message. Also it has become a pseudo standard to add additional metadata like this to the commit message. So we are following inline with that pattern. Currently we have HTML comments around the ps-id which hides it in PR descriptions in GitHub while still keeping it in the commit message. If you are on a team that can’t recognize the value it brings and refuses to have it in the commit messages. Then you are fundamentally working on a team that refuses to allow Git Patch Stack. Because without it Git Patch Stack can’t really exist. The best you can hope for is convincing them. But I imagine if they are that strongly against having a ps-id in the commit message they probably don’t hold that opinion solely on logic.
Other benefits of ps-id.
There is also the benefit of driving exposure via use by having the ps-id be visible. Maybe it would even be worth having a tag line or url of https://git-ps.sh in the line.
Commit Signing
Git Patch Stack supports Git Commit Signing via the following mechanisms.
- SSH signing
- GPG signing
It does not currently support signing via certificates.
Configuration
Git Patch Stack uses your official Git configuration to determine your Git Commit Signing configuration and follows suite with that.
Generally this involves having the following configs set in your ~/.gitconfig.
user.signingkey- for SSH signing this is the path to your SSH signing key, for GPG this is the GPG signing key identifiercommit.gpgsign-trueto enable either SSH or GPG signing when creating commitstag.gpgsign-trueto enable either SSH or GPG signing when creating tagsgpg.format-sshfor SSH signing, andopenpgpfor GPG signinggpg."ssh".allowedSignersFile- path to the allowed signers file, only needed for SSH signing
For further details please reference the Git documentation. The above is not supposed to provide all the possible details. It is just to provide you enough information to quickly be able to get started with configuring signing and be able to quickly look up documentation to refine your configuration.
Credential Management
If you are using GPG signing, the credential management is handled strictly by the GPG program that you are using. See the documentation from it for details.
However, if you are using SSH signing. Git Patch Stack securely manages your credentials for your signing keys so that you don’t have to enter the password for your signing keys every time. It uses platform specific secure credential management services. See the breakdown by platform below.
- macOS - keychain
- Linux - secret-service and kernel keyutils
- FreeBSD & OpenBSD - secret-service
- Windows - credential manager
Guides
The guides are intended to provide clear and concise step by step instructions on how to perform operations within Git Patch Stack while also providing detailed explanations of how those operations relate to Git.
Add patches to your stack
We’re going to focus on how we create patches on our stack and what a stack is
in terms of git?
TL;DR
A stack is simply a branch with an upstream tracking branch, e.g. main with
an upstream tracking branch of origin/main. You can create a patch on top of
your stack with the following.
- Make a change locally in your editor of choice
- Stage your change with
git add -p - Create patch (a.k.a. commit) with
git commit
WalkThrough
Git Patch Stack is really just a layer of tooling built directly on top of
git. So if we look at our git tree here, we have a small project.

It has an initial skeleton of a Rust project. That’s just a Hello World program
right now, and we can see we have a branch called main that were checked out
on. That’s why HEAD points to it, and we then have an upstream main with a
remote of origin. It happens to be where main points to on our GitHub
repository for this.
Technically, in Git Patch Stack terms, any branch that has an upstream tracking
branch is a Patch Stack. So you can have as many of these Patch Stacks as you
want, as long as they are branches that have an upstream tracking branch. To
add patches on to a stack, you first have to be checked out on a branch that
has an associated upstream tracking branch. In our case, main.
Make a change
Then we just make changes like we normally would in git. We add a commit and
that commit conceptually becomes a patch. So let’s do that real quick. Let’s go
look at our source code here. We have a main() function.
fn main() {
    println!("Hello, world!");
}
Let’s say that we want to add another function called foo() for some reason,
and we want this function to print “Foo”, nothing too crazy. So we add a
function. We’re not even going to use the function. We’re just going to add it
to the code base so that we can use it in the future.
fn main() {
    println!("Hello, world!");
}

fn foo() {
    println!("Foo");
}
That’s it. Now we just do a git diff to verify our changes.
diff --git a/src/main.rs b/src/main.rs
index e7a11a9..0e47771 100644
--- a/src/main.rs
+++ b/src/main.rs
@@ -1,3 +1,7 @@
 fn main() {
     println!("Hello, world!");
 }
+
+fn foo() {
+    println!("Foo");
+}
I have a git alias of
disetup, so I can just rungit dito get the diff quicker.
Once we verify the change is what we want, then we stage that change. We can
stage that change by doing a git add. Now we can do a git diff --cached and
that will show us all the changes that are staged as a diff.
diff --git a/src/main.rs b/src/main.rs
index e7a11a9..0e47771 100644
--- a/src/main.rs
+++ b/src/main.rs
@@ -1,3 +1,7 @@
 fn main() {
     println!("Hello, world!");
 }
+
+fn foo() {
+    println!("Foo");
+}
It looks good. Looks like the changes we want.
I have a git alias of
dcsetup, so I can just rungit dcto get the staged diff quicker.
Create Patch on Stack
If we do a git commit, it pops up the configured editor, and we can enter the
commit message.
Add foo() function

So that in the future we can print the message when necessary.
Ideally, we would provide more context but because this is a contrived example. We don’t really have it. Now we have a commit (a.k.a. patch).

If we look at our git tree, you can see we have a commit here that we’re
pointing to on main, which is the “Add foo() function” patch. And then
underneath that in the tree, we have the initial skeleton commit we had before.
Now, if we run gps ls, which is how we list our stack of patches.

We can now see that our stack of patches consists of one patch.
Add another Patch
So let’s add another one real quick just so we can see what it’s like to have two. Let’s just copy this and paste that, and change this word to bar, change this to bar, and then we’ll add another function.
fn main() {
    println!("Hello, world!");
}

fn foo() {
    println!("Foo");
}

fn bar() {
    println!("Bar");
}
Now we just git add, git dc to verify our staged code. All looks good. We
create another patch using git commit and enter the message.
Add bar() function

So that we can print the "Bar" message in the future.
Now we should have two patches in our stack.

We have patches zero, which is the index of the “Add foo() function” patch. And we have patch one which is the index of the “Add bar() function” patch.
The short SHA of these patches, a.k.a. commits, is visible to the right of the index and status space. We can also see the patch summaries to the right of the short SHA.
As you get into Git Patch Stack further, you’ll see status indications here that will indicate things like whether that patch has been requested for review, the patch has been integrated, or if there’s been changes since you requested review. But for now that’s it.
That’s how you add a patch to the top of your stack.
Hope you enjoyed.
List patches on your stack
How to list patches on your stack and their associated state information.
TL;DR
gps listorgps lsfor short
WalkThrough
The list command lists out your stack of patches in a format that exposes the
patch index on the far left followed by the short SHA of the git commit,
followed by the patch summary, and finally followed by the status information.
[index] [sha] [summary (50 chars) ] ( [status] )
The patch index value is used with other commands, e.g. gps show <patch-index>.
State information exists between a patch in the patch stack and a branch. As you use Git Patch Stack your patches will be associated with one or more local branches and each of those branches will likely have a remote tracking branch associated to them.
So we represent state with two main prefixes, l & r.
l- indicating that the following state indicators are between the local branch & patch in the patch stackr- indicating that the following state indicators are between the remote branch & patch in the patch stack
The presence of these prefixes also communicates the existence of a local or
remote branch in association with the patch. So if you saw a state of ( ) it
would indicate that the patch has no local branches & has no remote branches.
Each of these prefixes are paired with zero or more of the following state indicators.
*- the patch in the respective branch has a different diff than the patch in the patch stack!- the respective branch has one or more non-patch commits in it
The following are some simple examples of state indications, so you can start to understand.
( )- patch has no local & no remote branches associated( l )- patch has a local branch associated & the diff match( lr )- patch has a local branch & remote branch associated & the diffs match( l*r* )- patch has a local branch & remote branch associated, but the diffs don’t match( l*r*! )- patch has a local branch & remote branch associated, but the diffs don’t match & the remote has a non-patch commit in it
In the most common case you will have a single branch pairing (local & remote) associated with your patches, and you will see the patch state simply represented as above.
However, Git Patch Stack supports having multiple branch pairings associated with a patch and it also supports custom naming of branches if you don’t want to use a generated branch name. This is especially useful when creating a patch series.
If a patch falls into either of these scenarios the state will be presented in long form where the branch name is provided in front of each state indication. So each branch will have its branch name appear followed by its associated state indication.
[branch-name] [state indications]
These pairings of branch name and state indications are simply chained together
with spaces. So for example, if we assume we have a patch that is associated
with two branches, foo & bar. The patch state information might look
something like the following.
( foo lr bar l*r* )
In the above state information example we can see that there are 4 branches
that exist with the patch in them. Specifically, there is a local branch
named foo and it has a remote tracking branch that also has the patch in it.
We can see that because there is no * or ! characters after the l or r,
associated with the foo branch, we know that the patch diffs all match.
We can also see that the patch exists in another local branch named bar, as
well as the remote tracking branch of bar. The * characters here indicate
that both the copy of the patch in both the local bar branch and the remote
tracking branch of bar have different diffs than the patch in the patch
stack.
Pull integrated patches down
In this guide we’re going to focus on how to pull down integrated patches from upstream and have your stack replayed on top of the pulled patches.
TL;DR
gps pull- if conflict, resolve it
- if conflict,
git addresolved conflict files - if conflict,
git rebase --continue - repeat steps 2 to 4 for each conflicting patch
WalkThrough
The TL;DR section makes this feel trivial. And generally it is pretty trivial as you
simply run gps pull, which effectively runs a git fetch to update your local
repository’s knowledge of the upstream repository’s Git tree followed by a
git rebase --onto <upstream-branch-name> <upstream-branch-name> <head-branch-shortname>
, e.g. git rebase --onto origin/main origin/main main.
Conflicts occurring during the rebase are what might catch you off guard the first time. Here in your stack is exactly where you want to be confronted with and resolve any conflicts though. It forces you to integrate the upstream branch’s changes with your stack more often and with smaller increments which makes conflict resolution easier because the scope of changes is smaller. Beyond that having integration be bound to the pull is also beneficial because it forces you to integrate your stack when fetching any changes from upstream.
Given that this command performs a rebase it is beneficial to have a good understanding of what rebasing is and what happens during a rebase. To get a deeper understanding of rebase and gain some comfort with it you can check out ProGit - Git Branching - Rebasing.
Merge Conflicts vs Rebase Conflicts
In addition to being comfortable with the basics of rebasing it is important to
understand that merge conflicts that you might be used to with git merge are
quite different than the conflicts you will run into with git rebase. When
presented with a conflict from a git merge operation you are effectively
resolving all the conflicts of all the commits involved as one singular
conflict.
The git rebase operation works in a completely different manner. It
effectively lifts up your stack of patches and plays them back one by one on
top of the upstream branch (e.g. origin/main). This is important because
conflicts are risen at the commit level. This means as it is going through
and replaying each commit on top of one another it is checking if there is a
conflict or not. If there isn’t a conflict then it applies that commit cleanly
and moves on to playing the next commit in the stack. If there is a conflict it
pauses the rebase and leaves you in a working state with the conflict present.
You tactically resolve this the same way you would any conflict. However, you
need to understand that the scope of the conflict is specific to the commit that
was replayed and not all the commits combined together like a git merge would
be. This means when you resolve that conflict you should resolve it as if none
of the commits above it existed yet.
This works brilliantly with Git Patch Stack because you write patches as
logical changes in alignment with the application architecture. This means when
conflicts arise they are within the scope of some application architecture
concept or within the integration of an application architecture concept. This
makes understanding and resolving conflicts much easier than with git merge,
where the changes aren’t scoped to a particular application architecture
concept.
Once you have resolved the conflict and staged the change with git add you
can continue the rebase process with git rebase --continue to have it pick
back up from where it was paused.
Reorder patches
One of the core concepts of Git Patch Stack is this idea of starting out with patches in a non-reviewable state and then iterating on them to get them to a state where they are ready for review. As we iterate on various patches it is crucial to be able to reorder the patches on your stack so that the dependencies can be moved to the bottom of the stack.
TL;DR
gps rebase- reorder the commit lines presented, in your configured editor, into the order you want them
- save and quit the editor
WalkThrough
The gps rebase command is a convenience function that really runs an
interactive rebase of the stack on top of it’s associated upstream, e.g. git rebase -i --onto origin/main origin/main main.
So understanding how to reorder patches with this command is really simply learning how to reorder commits using git’s interactive rebase.
Let’s start with the following patch stack (gps ls).

Let’s say that function B needs to become a dependency of function A. In order to put our stack into a state where we can actually iterate on function A adding B as a dependency we need to first reorder the patches so that “Add function B” is at the bottom of the stack.
To do this we start by running gps rebase to kick off the interactive rebase.
It presents the following in our configured editor.
pick 57f6095 Add function A
pick 1a7252c Add function B
pick abf01ed Add function C

# Rebase 016b6ec..abf01ed onto 016b6ec (3 commands)
#
# Commands:
# p, pick <commit> = use commit
# r, reword <commit> = use commit, but edit the commit message
# e, edit <commit> = use commit, but stop for amending
# s, squash <commit> = use commit, but meld into previous commit
# f, fixup [-C | -c] <commit> = like "squash" but keep only the previous
#                    commit's log message, unless -C is used, in which case
#                    keep only this commit's message; -c is same as -C but
#                    opens the editor
# x, exec <command> = run command (the rest of the line) using shell
# b, break = stop here (continue rebase later with 'git rebase --continue')
# d, drop <commit> = remove commit
# l, label <label> = label current HEAD with a name
# t, reset <label> = reset HEAD to a label
# m, merge [-C <commit> | -c <commit>] <label> [# <oneline>]
#         create a merge commit using the original merge commit's
#         message (or the oneline, if no original merge commit was
#         specified); use -c <commit> to reword the commit message
# u, update-ref <ref> = track a placeholder for the <ref> to be updated
#                       to this position in the new commits. The <ref> is
#                       updated at the end of the rebase
#
# These lines can be re-ordered; they are executed from top to bottom.
#
# If you remove a line here THAT COMMIT WILL BE LOST.
#
# However, if you remove everything, the rebase will be aborted.
#
To reorder the commits we simply reorder the lines of text in this buffer so that they are in the order we want. Note: The stack is inverted when presented in an interactive rebase. So the bottom most commit on the stack is actually the top most commit. To accomplish our goals lets swap “Add function A” and “Add function B” as follows.
pick 1a7252c Add function B
pick 57f6095 Add function A
pick abf01ed Add function C

# Rebase 016b6ec..abf01ed onto 016b6ec (3 commands)
#
# Commands:
# p, pick <commit> = use commit
# r, reword <commit> = use commit, but edit the commit message
# e, edit <commit> = use commit, but stop for amending
# s, squash <commit> = use commit, but meld into previous commit
# f, fixup [-C | -c] <commit> = like "squash" but keep only the previous
#                    commit's log message, unless -C is used, in which case
#                    keep only this commit's message; -c is same as -C but
#                    opens the editor
# x, exec <command> = run command (the rest of the line) using shell
# b, break = stop here (continue rebase later with 'git rebase --continue')
# d, drop <commit> = remove commit
# l, label <label> = label current HEAD with a name
# t, reset <label> = reset HEAD to a label
# m, merge [-C <commit> | -c <commit>] <label> [# <oneline>]
#         create a merge commit using the original merge commit's
#         message (or the oneline, if no original merge commit was
#         specified); use -c <commit> to reword the commit message
# u, update-ref <ref> = track a placeholder for the <ref> to be updated
#                       to this position in the new commits. The <ref> is
#                       updated at the end of the rebase
#
# These lines can be re-ordered; they are executed from top to bottom.
#
# If you remove a line here THAT COMMIT WILL BE LOST.
#
# However, if you remove everything, the rebase will be aborted.
#
We then save and quit the editor, and it reorders the commits as part of the
rebase. This leaves our patch stack as follows (gps ls).

Exactly the state we wanted it to be in so that we can iterate on the “Add function A” patch to make it integrate with function B.
Drop a patch
As we develop software sometimes we come up with ideas that we pretty quickly decide aren’t great. We generally want to throw this code away. In Git Patch Stack because our patches represent logical changes we do this by simply dropping a patch out of our stack.
TL;DR
gps rebase- mark the commit we want to drop with
dordrop - save and quit the editor
WalkThrough
The gps rebase command is a convenience function that really runs an
interactive rebase of the stack on top of it’s associated upstream, e.g.
git rebase -i --onto origin/main origin/main main.
So understanding how to drop a patch with this command is really simply learning how to drop commits using git’s interactive rebase.
Let’s start with the following patch stack (gps ls).

Let’s say that “Add function B” is no longer need, and we just want to get rid of it.
To do this we start by running gps rebase to kick off the interactive rebase.
It presents the following in our configured editor.
pick 57f6095 Add function A
pick 1a7252c Add function B
pick abf01ed Add function C

# Rebase 016b6ec..abf01ed onto 016b6ec (3 commands)
#
# Commands:
# p, pick <commit> = use commit
# r, reword <commit> = use commit, but edit the commit message
# e, edit <commit> = use commit, but stop for amending
# s, squash <commit> = use commit, but meld into previous commit
# f, fixup [-C | -c] <commit> = like "squash" but keep only the previous
#                    commit's log message, unless -C is used, in which case
#                    keep only this commit's message; -c is same as -C but
#                    opens the editor
# x, exec <command> = run command (the rest of the line) using shell
# b, break = stop here (continue rebase later with 'git rebase --continue')
# d, drop <commit> = remove commit
# l, label <label> = label current HEAD with a name
# t, reset <label> = reset HEAD to a label
# m, merge [-C <commit> | -c <commit>] <label> [# <oneline>]
#         create a merge commit using the original merge commit's
#         message (or the oneline, if no original merge commit was
#         specified); use -c <commit> to reword the commit message
# u, update-ref <ref> = track a placeholder for the <ref> to be updated
#                       to this position in the new commits. The <ref> is
#                       updated at the end of the rebase
#
# These lines can be re-ordered; they are executed from top to bottom.
#
# If you remove a line here THAT COMMIT WILL BE LOST.
#
# However, if you remove everything, the rebase will be aborted.
#
To drop the commit we simply mark it for dropping with either d or drop
instead of its default pick. If you forget the marking you can always
reference the comment Git includes in the interactive rebase buffer. So in this
case we mark the “Add function B” commit with d as follows.
Note: The stack is inverted when presented in an interactive rebase. So the bottom most commit on the stack is actually the top most commit. This can be confusing until you get used to it.
pick 57f6095 Add function A
d 1a7252c Add function B
pick abf01ed Add function C

# Rebase 016b6ec..abf01ed onto 016b6ec (3 commands)
#
# Commands:
# p, pick <commit> = use commit
# r, reword <commit> = use commit, but edit the commit message
# e, edit <commit> = use commit, but stop for amending
# s, squash <commit> = use commit, but meld into previous commit
# f, fixup [-C | -c] <commit> = like "squash" but keep only the previous
#                    commit's log message, unless -C is used, in which case
#                    keep only this commit's message; -c is same as -C but
#                    opens the editor
# x, exec <command> = run command (the rest of the line) using shell
# b, break = stop here (continue rebase later with 'git rebase --continue')
# d, drop <commit> = remove commit
# l, label <label> = label current HEAD with a name
# t, reset <label> = reset HEAD to a label
# m, merge [-C <commit> | -c <commit>] <label> [# <oneline>]
#         create a merge commit using the original merge commit's
#         message (or the oneline, if no original merge commit was
#         specified); use -c <commit> to reword the commit message
# u, update-ref <ref> = track a placeholder for the <ref> to be updated
#                       to this position in the new commits. The <ref> is
#                       updated at the end of the rebase
#
# These lines can be re-ordered; they are executed from top to bottom.
#
# If you remove a line here THAT COMMIT WILL BE LOST.
#
# However, if you remove everything, the rebase will be aborted.
#
We then save and quit the editor and it drops commits marked with d or drop
as part of the rebase. This leaves our patch stack as follows (gps ls).

Exactly the state we wanted it to be in.
Add a patch in the middle
Another common action you will want to perform when working with a stack of patches is being able to add a patch at a specific point in the middle of your stack.
This is beneficial over adding a patch on top of the stack and reordering it into its correct position because it makes it so that when you are creating your patch it is based on the correct dependent code and not code that is only introduced higher up in the stack. It also has the benefit of forcing you to properly integrate changes higher up in the stack with your newly introduced patch.
This operation is really just a specific use case of a Git interactive rebase. So as with most of these operations being comfortable with Git’s interactive rebase is key.
TL;DR
For those who just want a quick reminder reference here is the TL;DR. For those who need a bit more context and detail through the walk through read the sections below.
gps rebase- do an interactive rebase of the patch stack & mark the patch you want to add a new patch after withedit, it will drop you out into the shell at that patch- make your changes to the code
git add- stage changes you want in the patchgit commit- create the patchgit rebase --continue- continue the rebase to play the other commits on top of the new commits you created
Initial State
For this example lets assume that we have a Patch Stack that has the following patches.

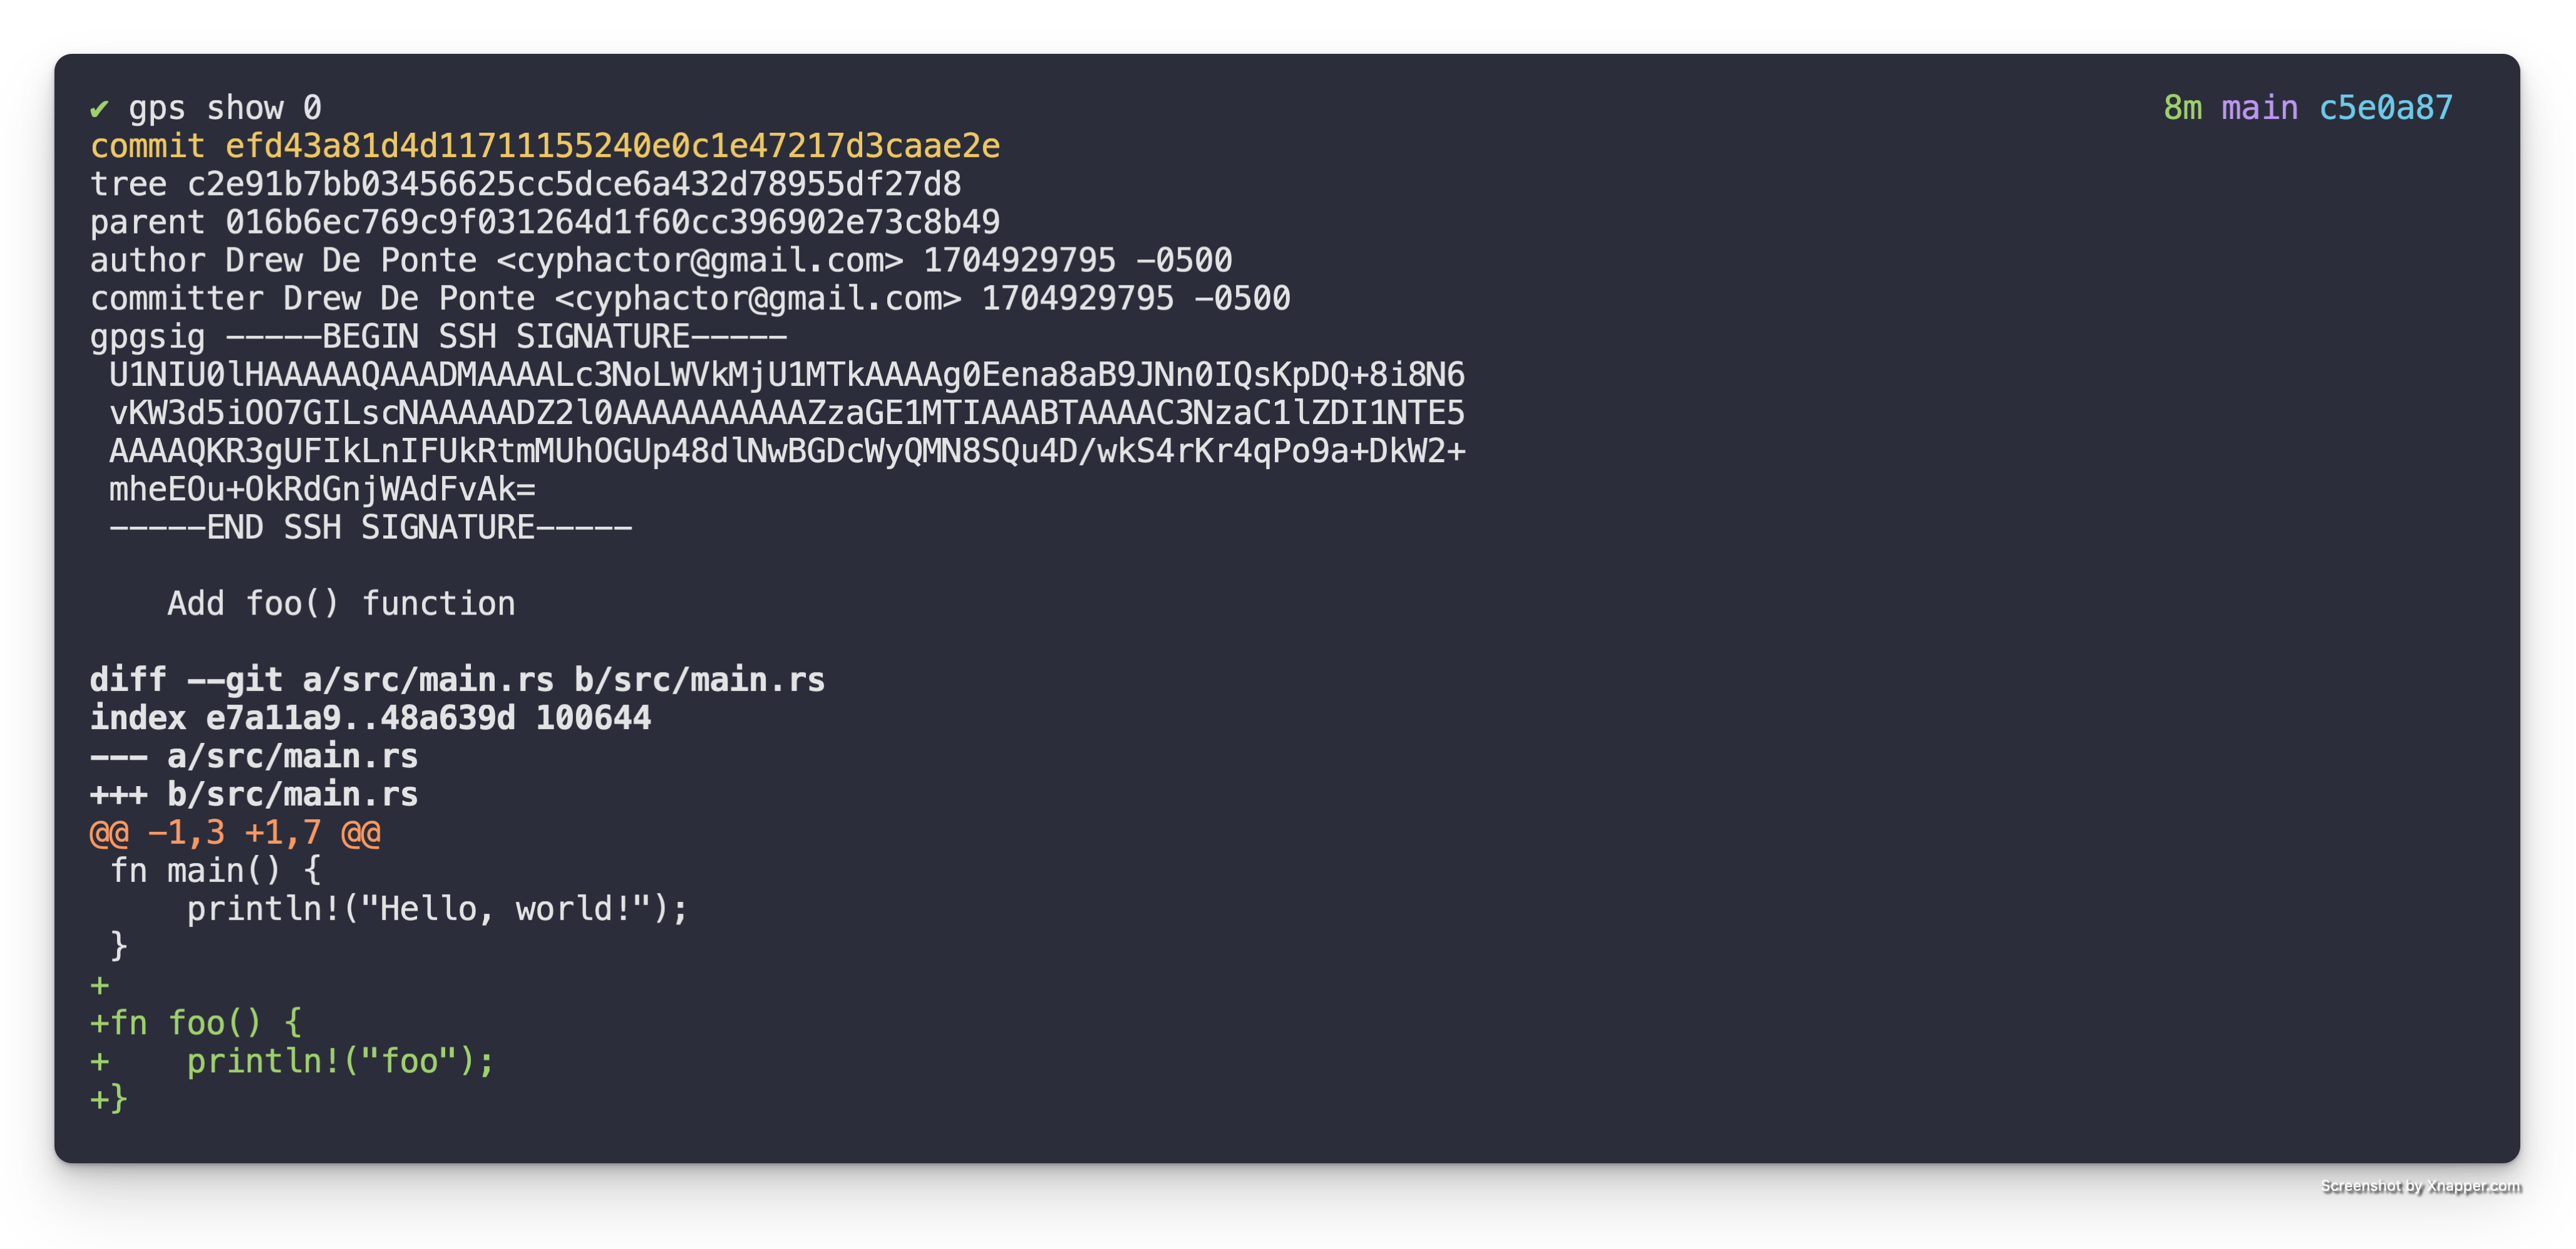
As we can see from the first patch Add foo() function, it adds the foo()
function.
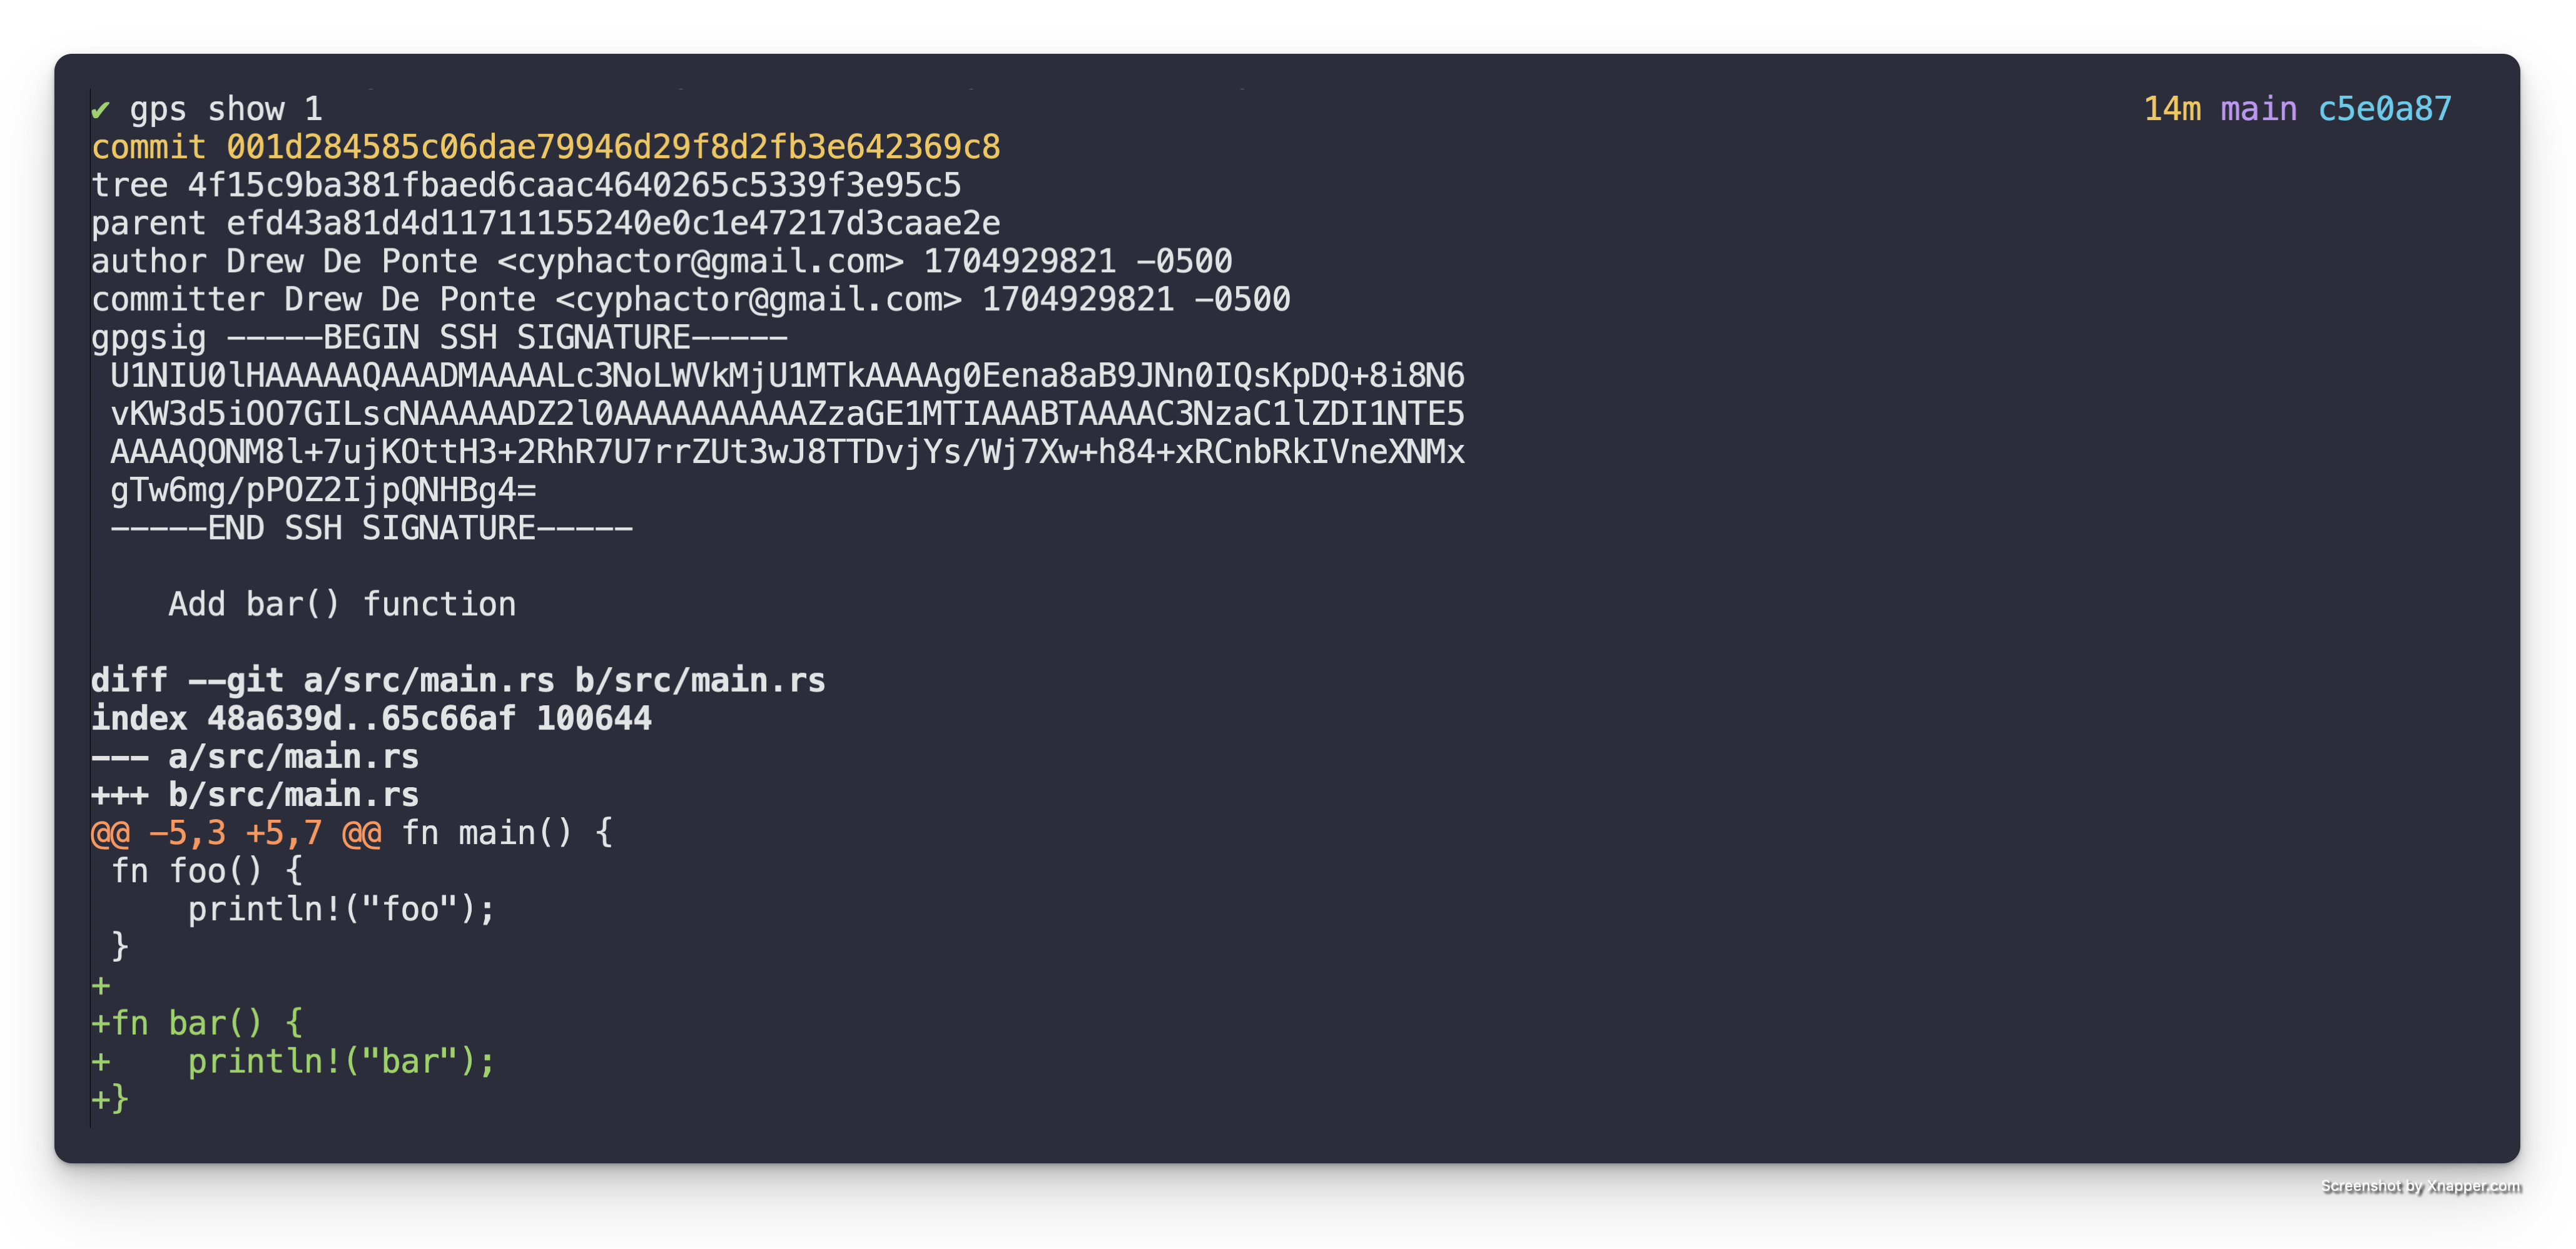
The second patch, Add bar() function, adds the bar() function as seen in
the diff below.
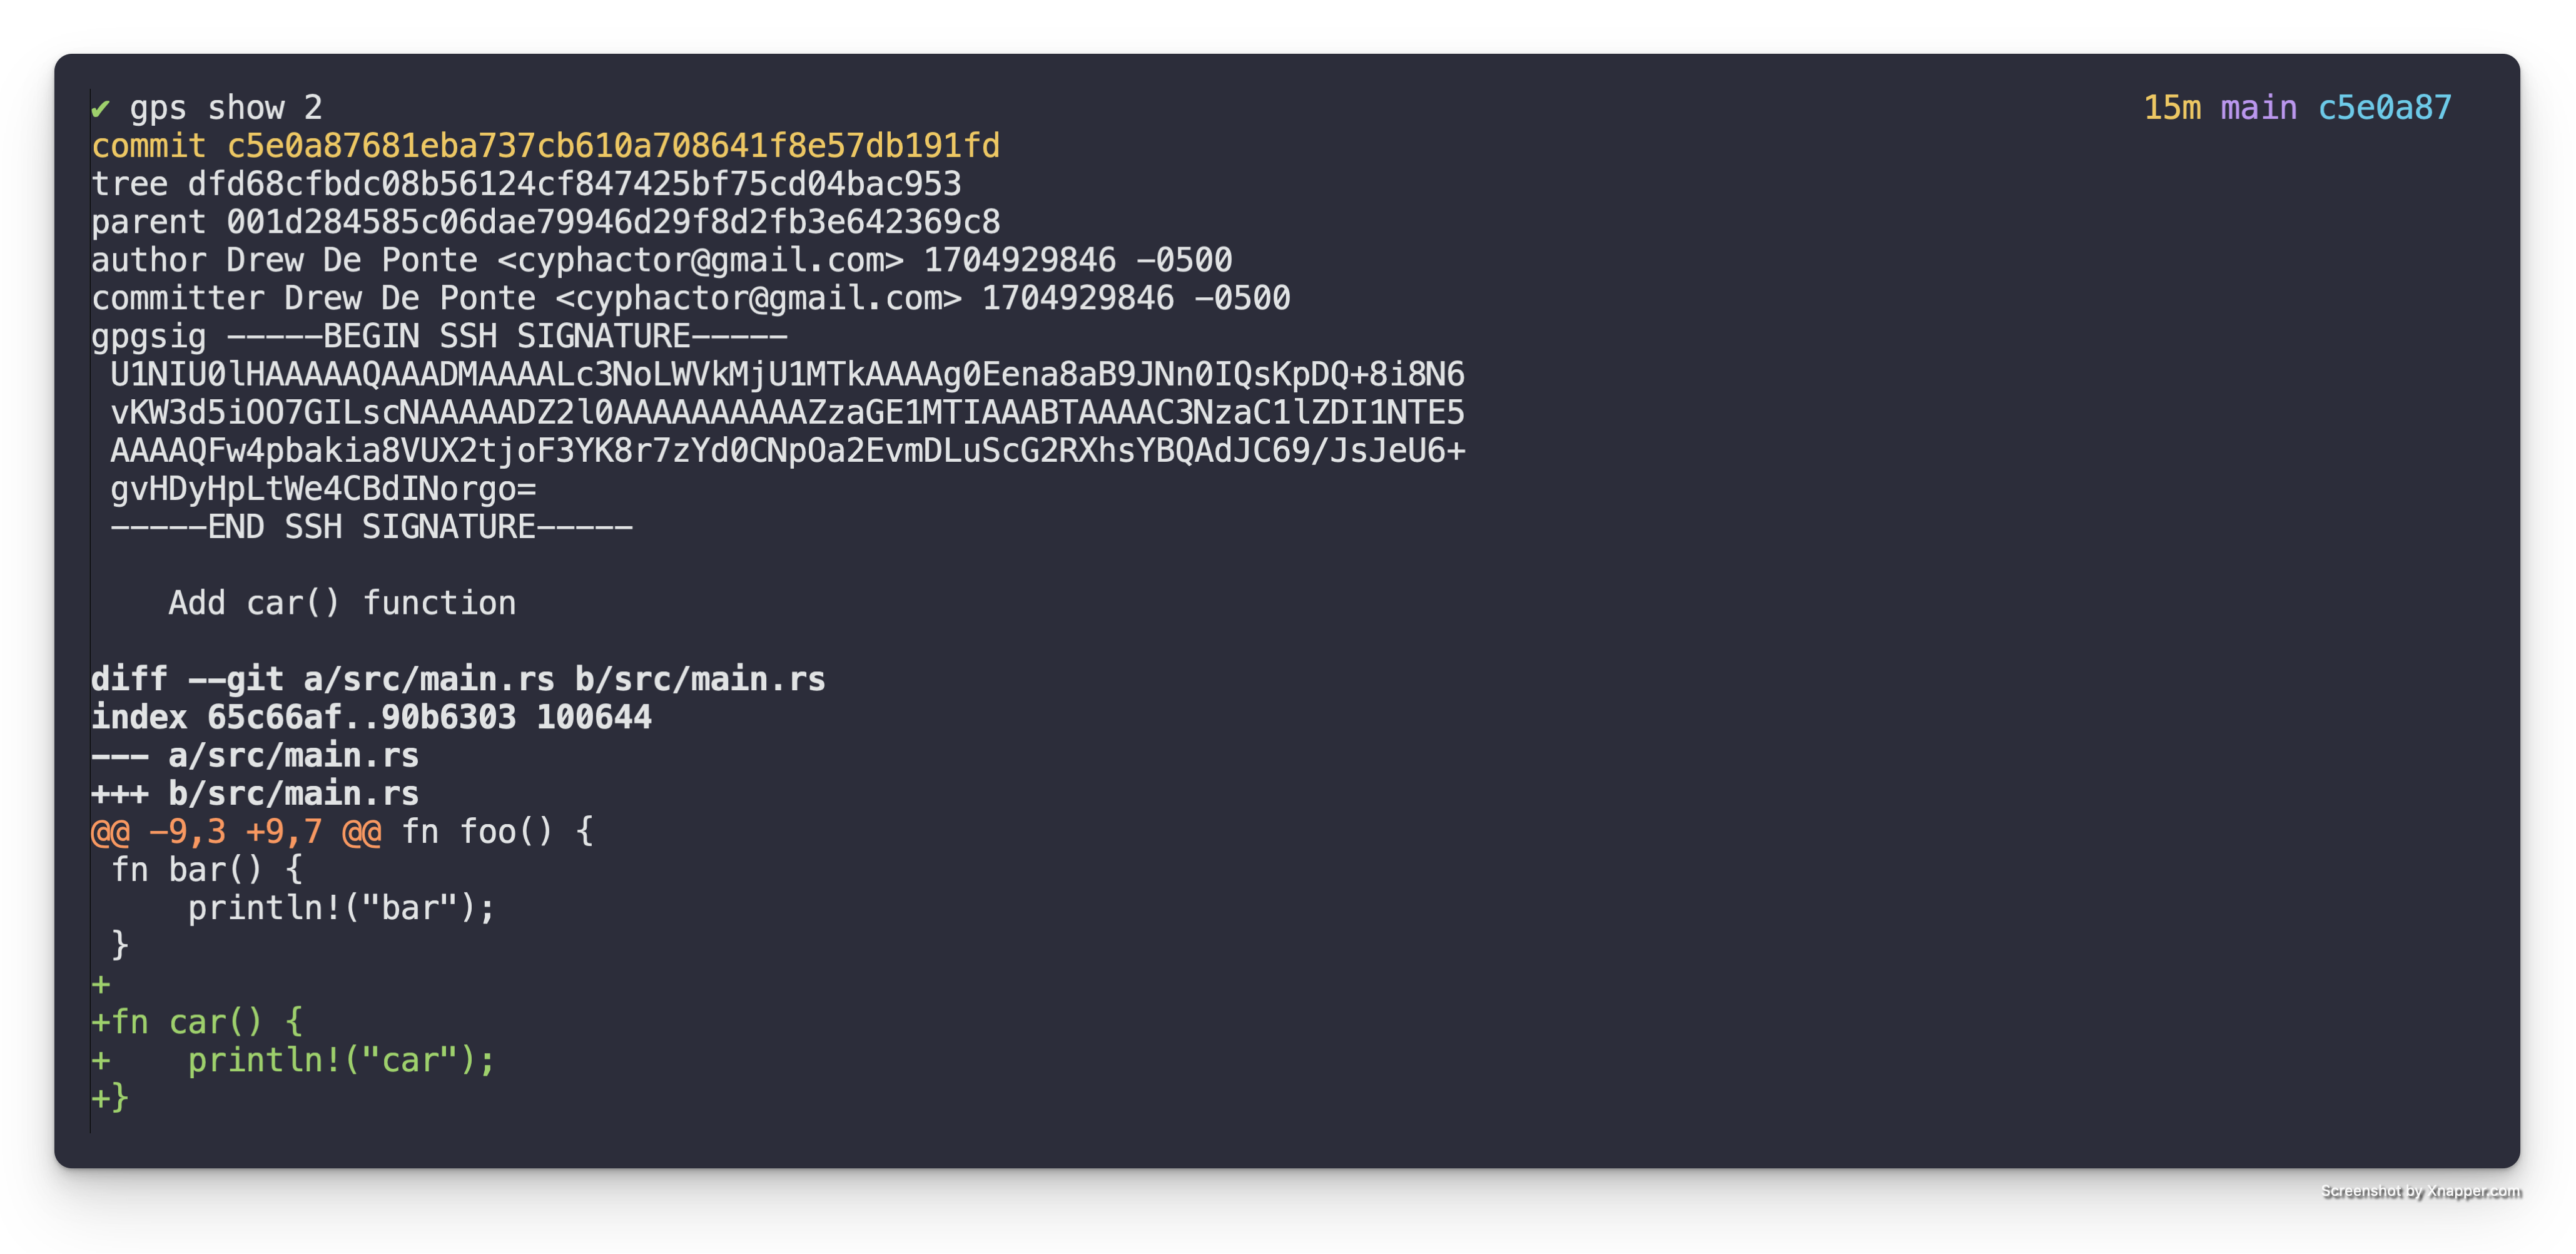
The third patch, Add car() function adds the car() function in the diff
below.
Add the foobar() function
Let us say for sake of discussion we want to add a new function, foobar()
that is composed of the foo() and bar() functions respectively. So we want
to write something like the following.
#![allow(unused)]
fn main() {
fn foobar() {
	foo();
	bar();
}
}
Edit Mode
To accomplish this we need to utilize an interactive rebase to enter “edit” mode in the correct place in the Patch Stack. In this particular case we want to rebase our Patch Stack.
gps rebase
This will bring up the following in your editor.
pick efd43a8 Add foo() function
pick 001d284 Add bar() function
pick c5e0a87 Add car() function

# Rebase 016b6ec..c5e0a87 onto 016b6ec (3 commands)
#
# Commands:
# p, pick <commit> = use commit
# r, reword <commit> = use commit, but edit the commit message
# e, edit <commit> = use commit, but stop for amending
# s, squash <commit> = use commit, but meld into previous commit
# f, fixup [-C | -c] <commit> = like "squash" but keep only the previous
#                    commit's log message, unless -C is used, in which case
#                    keep only this commit's message; -c is same as -C but
#                    opens the editor
# x, exec <command> = run command (the rest of the line) using shell
# b, break = stop here (continue rebase later with 'git rebase --continue')
# d, drop <commit> = remove commit
# l, label <label> = label current HEAD with a name
# t, reset <label> = reset HEAD to a label
# m, merge [-C <commit> | -c <commit>] <label> [# <oneline>]
#         create a merge commit using the original merge commit's
#         message (or the oneline, if no original merge commit was
#         specified); use -c <commit> to reword the commit message
# u, update-ref <ref> = track a placeholder for the <ref> to be updated
#                       to this position in the new commits. The <ref> is
#                       updated at the end of the rebase
#
# These lines can be re-ordered; they are executed from top to bottom.
#
# If you remove a line here THAT COMMIT WILL BE LOST.
#
# However, if you remove everything, the rebase will be aborted.
#
In the interactive rebase buffer we want to change the action for the Add bar() function patch to edit, so it is as follows.
pick efd43a8 Add foo() function
edit 001d284 Add bar() function
pick c5e0a87 Add car() function

# Rebase 016b6ec..c5e0a87 onto 016b6ec (3 commands)
#
# Commands:
# p, pick <commit> = use commit
# r, reword <commit> = use commit, but edit the commit message
# e, edit <commit> = use commit, but stop for amending
# s, squash <commit> = use commit, but meld into previous commit
# f, fixup [-C | -c] <commit> = like "squash" but keep only the previous
#                    commit's log message, unless -C is used, in which case
#                    keep only this commit's message; -c is same as -C but
#                    opens the editor
# x, exec <command> = run command (the rest of the line) using shell
# b, break = stop here (continue rebase later with 'git rebase --continue')
# d, drop <commit> = remove commit
# l, label <label> = label current HEAD with a name
# t, reset <label> = reset HEAD to a label
# m, merge [-C <commit> | -c <commit>] <label> [# <oneline>]
#         create a merge commit using the original merge commit's
#         message (or the oneline, if no original merge commit was
#         specified); use -c <commit> to reword the commit message
# u, update-ref <ref> = track a placeholder for the <ref> to be updated
#                       to this position in the new commits. The <ref> is
#                       updated at the end of the rebase
#
# These lines can be re-ordered; they are executed from top to bottom.
#
# If you remove a line here THAT COMMIT WILL BE LOST.
#
# However, if you remove everything, the rebase will be aborted.
#
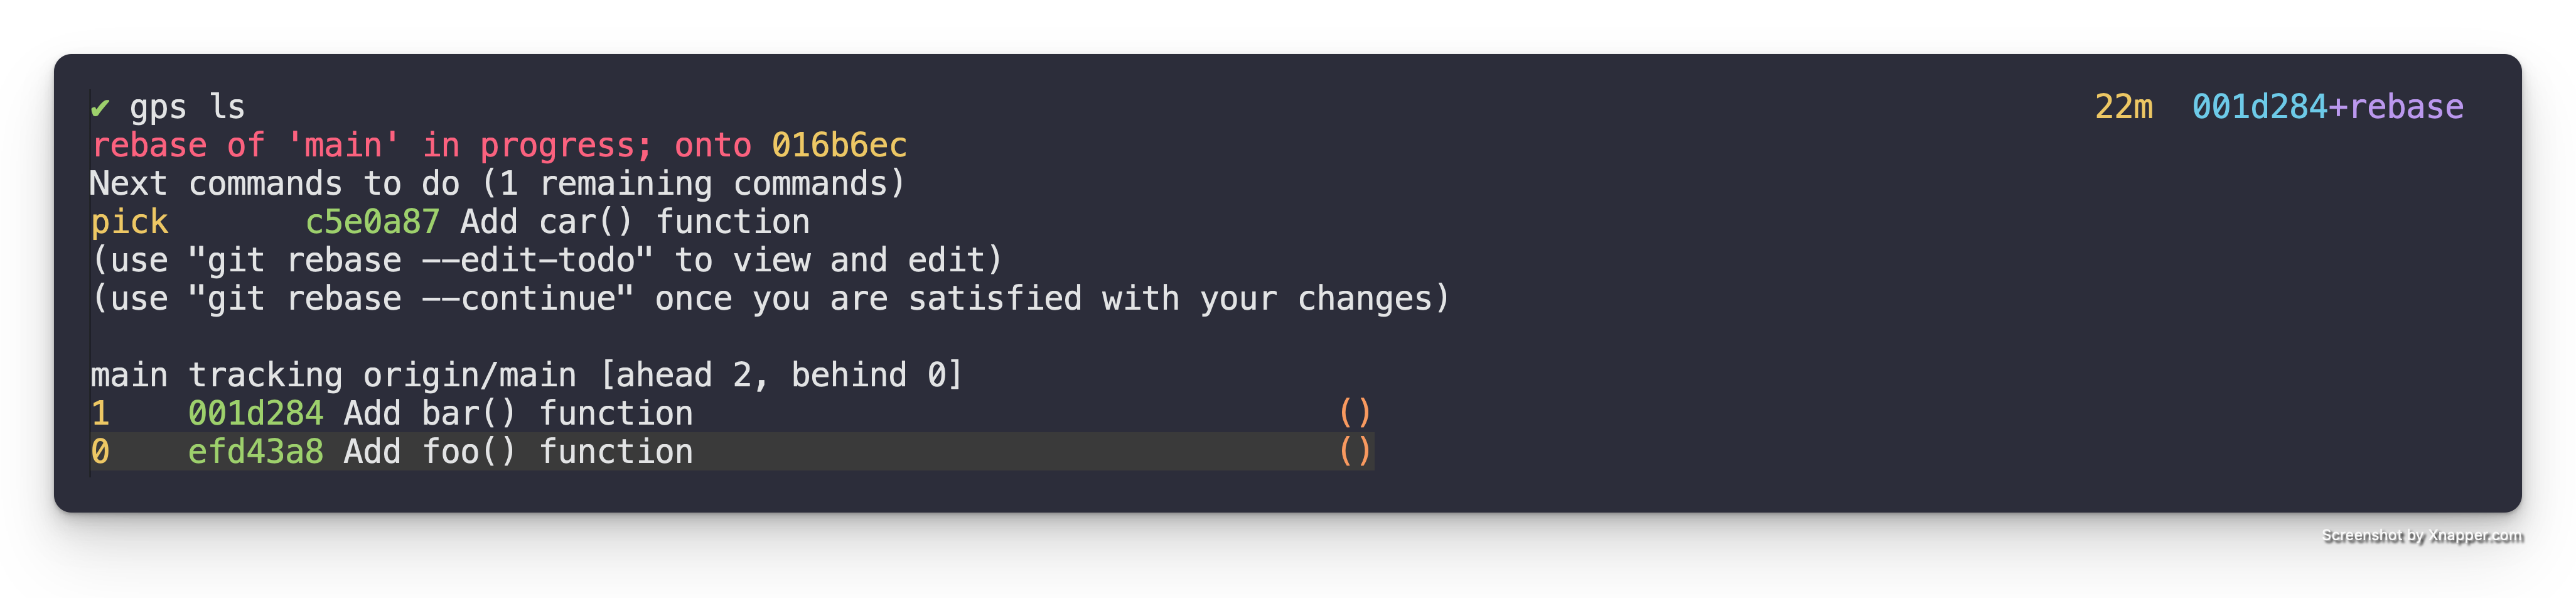
When you save & quit the editor it will run the specified interactive rebase
commands. In this case pick (meaning keep) the first patch and then stop on the
second patch allowing for editing because we specified, edit. When it does
this it will drop you back to the console with a message similar to the
following:
Stopped at 001d284...  Add bar() function
You can amend the commit now, with

  git commit --amend '-S'

Once you are satisfied with your changes, run

  git rebase --continue
Note: This drops you right after the patch (a.k.a. commit) that was marked
for edit in the interactive rebase. We can see this if we look run gps ls.
Add foobar() function patch
Now that we know that we are in the middle of a rebase, and we know where we are located in terms of the patches. We are ready to simply create a new patch right where we are.
When we open the src/main.rs file to add the new foobar() function we see
the following.
fn main() {
    println!("Hello, world!");
}

fn foo() {
  println!("Foo");
}

fn bar() {
  println!("Bar");
}
Note: We do NOT see the car() function. That is because that patch is
above our current location in the stack. Which is exactly what we want.
So we add the foobar() function so our code is as follows.
fn main() {
    println!("Hello, world!");
}

fn foo() {
  println!("Foo");
}

fn bar() {
  println!("Bar");
}

fn foobar() {
  foo();
  bar();
}
Then we stage the change with git add and create the patch with git commit
as we normally would. After creating the patch if we look at the gps ls
output we will see the following.
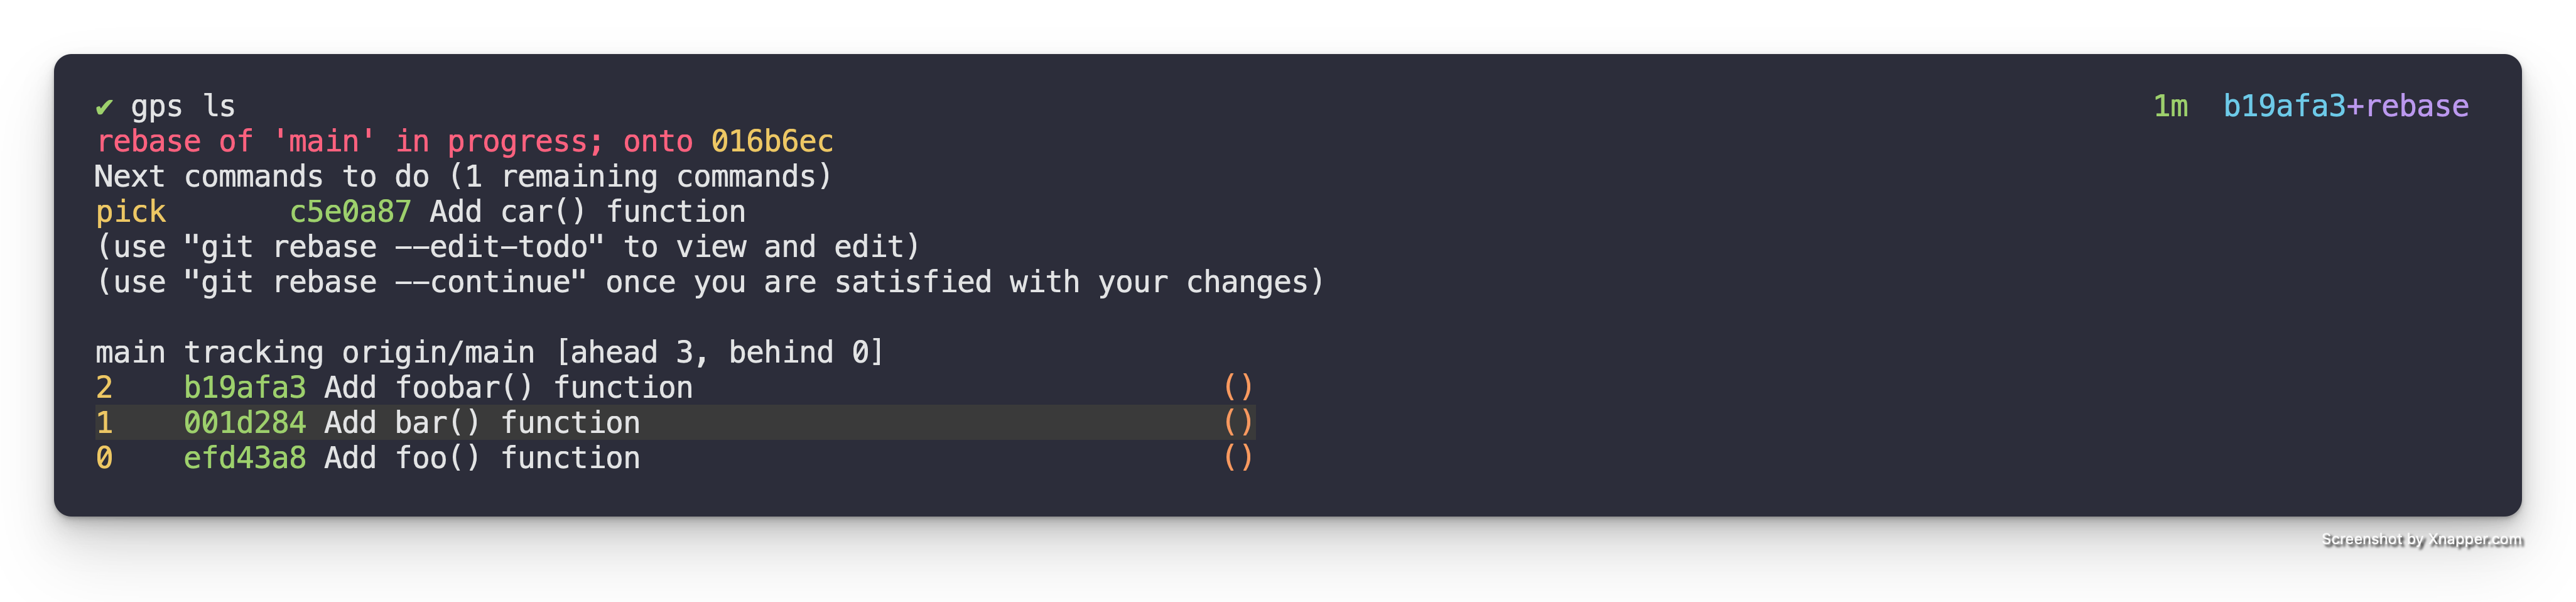
Here we can see the new Add foobar() function patch but we can also see that
the Add car() function patch isn’t stacked on top of it yet. This is because
we are still in the middle of the rebase.
Finish the Rebase
To replay the rest of the patches on top of the new patch(es) we just created we simply run the following.
git rebase --continue
Potential Conflicts
Depending on the changes you made you may run into conflicts that you created with the patches above. This is actually exactly what you want because if you made the change in the correct location in your stack then you want it to force you to integrate the above patches with the new change.
In the case of our example we get the following output telling us there is a conflict.
Auto-merging src/main.rs
CONFLICT (content): Merge conflict in src/main.rs
error: could not apply c5e0a87... Add car() function
hint: Resolve all conflicts manually, mark them as resolved with
hint: "git add/rm <conflicted_files>", then run "git rebase --continue".
hint: You can instead skip this commit: run "git rebase --skip".
hint: To abort and get back to the state before "git rebase", run "git rebase --abort".
Could not apply c5e0a87... Add car() function
This happened because the foobar() function definition that we introduced
into the src/main.rs file was added in the same location that the car()
function definition was created before.
If we look at src/main.rs right now it looks like the following.
fn main() {
    println!("Hello, world!");
}

fn foo() {
  println!("Foo");
}

fn bar() {
  println!("Bar");
}

<<<<<<< HEAD
fn foobar() {
  foo();
  bar();
=======
fn car() {
  println!("Car");
>>>>>>> 3d490f8 (Add car() function)
}
We can resolve this by simply moving the car() definition down below
foobar() and remove the conflict markers like so.
fn main() {
    println!("Hello, world!");
}

fn foo() {
  println!("Foo");
}

fn bar() {
  println!("Bar");
}

fn foobar() {
  foo();
  bar();
}

fn car() {
  println!("Car");
}
Then we simply stage the conflict resolution state with git add and request
that it continue the rebase with git rebase --continue.
Since we have resolved all the conflicts we see the following out.
[detached HEAD e9cdd6a] Add car() function
 1 file changed, 4 insertions(+)
Successfully rebased and updated refs/heads/main.
If we list our Patch Stack it will now look as follows.

And we have successfully added a patch into the middle of our stack!
Edit a patch
Given that part of Git Patch Stack is iterating on patches you will likely need to modify an existing patch. One common way of modifying an existing patch is to amend it.
This is beneficial over adding a patch on top of the stack, reordering it into its correct position, and squashing it because it makes it so that when you are amending your patch it is based on the correct dependent code and not code that is only introduced higher up in the stack. It also has the benefit of forcing you to properly integrate changes higher up in the stack with your newly introduced patch.
This operation is really just a specific use case of a Git interactive rebase. So as with most of these operations being comfortable with Git’s interactive rebase is key.
TL;DR
For those who just want a quick reminder reference here is the TL;DR. For those who need a bit more context and detail, the walk through provides it in the sections below.
gps rebase- do an interactive rebase of the patch stack & mark the patch you want to amend withedit, it will drop you out into the shell at that patch- make your changes to the code
git add- stage changes you want to amend to the patch marked witheditgit commit --amend- amend the current patchgit rebase --continue- continue the rebase to play the other commits on top of the new commits you created
Initial State
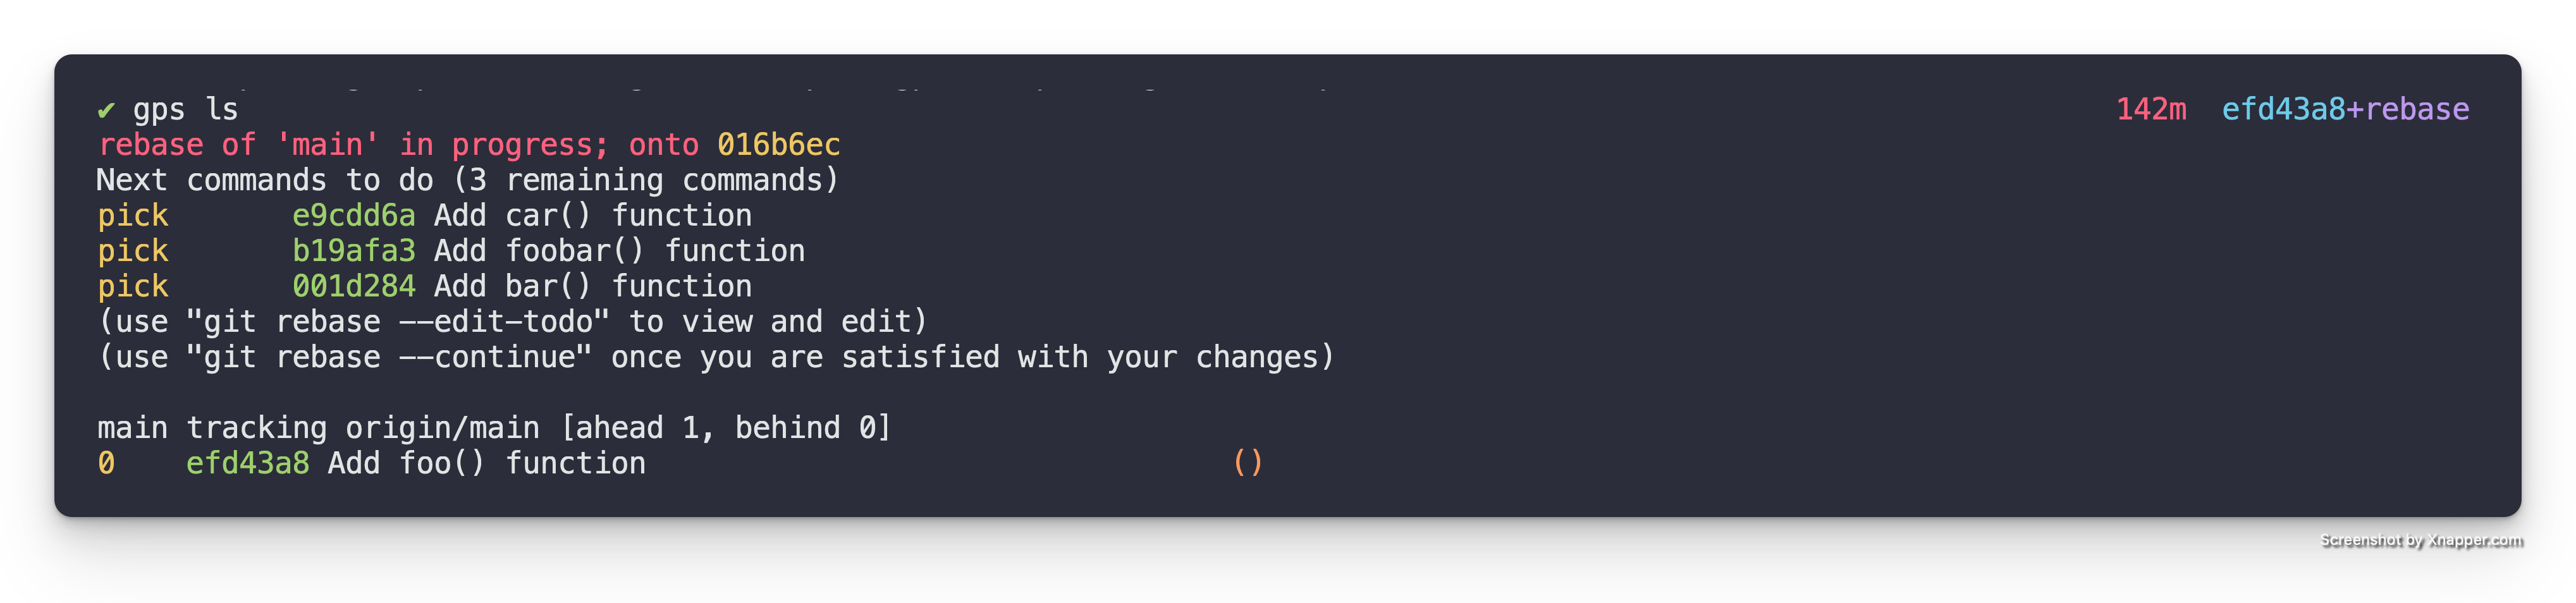
For this example let’s assume that we have a Patch Stack that has the following patches.

Amend the foo() function
Let us say for sake of discussion we want to amend the, Add foo() function
patch so that it instead prints out "Hello Foo".
Edit Mode
To accomplish this we need to utilize an interactive rebase to enter “edit” mode in the correct place in the Patch Stack. In this particular case we want to rebase our Patch Stack.
gps rebase
This will bring up the following in your editor.
pick efd43a8 Add foo() function
pick 001d284 Add bar() function
pick b19afa3 Add foobar() function
pick e9cdd6a Add car() function

# Rebase 016b6ec..e9cdd6a onto 016b6ec (4 commands)
#
# Commands:
# p, pick <commit> = use commit
# r, reword <commit> = use commit, but edit the commit message
# e, edit <commit> = use commit, but stop for amending
# s, squash <commit> = use commit, but meld into previous commit
# f, fixup [-C | -c] <commit> = like "squash" but keep only the previous
#                    commit's log message, unless -C is used, in which case
#                    keep only this commit's message; -c is same as -C but
#                    opens the editor
# x, exec <command> = run command (the rest of the line) using shell
# b, break = stop here (continue rebase later with 'git rebase --continue')
# d, drop <commit> = remove commit
# l, label <label> = label current HEAD with a name
# t, reset <label> = reset HEAD to a label
# m, merge [-C <commit> | -c <commit>] <label> [# <oneline>]
#         create a merge commit using the original merge commit's
#         message (or the oneline, if no original merge commit was
#         specified); use -c <commit> to reword the commit message
# u, update-ref <ref> = track a placeholder for the <ref> to be updated
#                       to this position in the new commits. The <ref> is
#                       updated at the end of the rebase
#
# These lines can be re-ordered; they are executed from top to bottom.
#
# If you remove a line here THAT COMMIT WILL BE LOST.
#
# However, if you remove everything, the rebase will be aborted.
#
In the interactive rebase buffer we want to change the action for the Add foo() function patch to edit, so it is as follows.
edit efd43a8 Add foo() function
pick 001d284 Add bar() function
pick b19afa3 Add foobar() function
pick e9cdd6a Add car() function

# Rebase 016b6ec..e9cdd6a onto 016b6ec (4 commands)
#
# Commands:
# p, pick <commit> = use commit
# r, reword <commit> = use commit, but edit the commit message
# e, edit <commit> = use commit, but stop for amending
# s, squash <commit> = use commit, but meld into previous commit
# f, fixup [-C | -c] <commit> = like "squash" but keep only the previous
#                    commit's log message, unless -C is used, in which case
#                    keep only this commit's message; -c is same as -C but
#                    opens the editor
# x, exec <command> = run command (the rest of the line) using shell
# b, break = stop here (continue rebase later with 'git rebase --continue')
# d, drop <commit> = remove commit
# l, label <label> = label current HEAD with a name
# t, reset <label> = reset HEAD to a label
# m, merge [-C <commit> | -c <commit>] <label> [# <oneline>]
#         create a merge commit using the original merge commit's
#         message (or the oneline, if no original merge commit was
#         specified); use -c <commit> to reword the commit message
# u, update-ref <ref> = track a placeholder for the <ref> to be updated
#                       to this position in the new commits. The <ref> is
#                       updated at the end of the rebase
#
# These lines can be re-ordered; they are executed from top to bottom.
#
# If you remove a line here THAT COMMIT WILL BE LOST.
#
# However, if you remove everything, the rebase will be aborted.
#
When you save & quit the editor it will run the specified interactive rebase
commands. In this case editing the first patch and then stopping for editing
because we specified, edit. When it does this it will drop you back to the
console with a message similar to the following:
Stopped at efd43a8...  Add foo() function
You can amend the commit now, with

  git commit --amend '-S'

Once you are satisfied with your changes, run

  git rebase --continue
Note: This drops you right after the patch (a.k.a. commit) that was marked
for edit in the interactive rebase. We can see this if we look at the gps ls output.
Add foobar() function patch
Now that we know that we are located on the patch we want to amend. We are ready to simply amend right where we are.
When we open the src/main.rs file and modify the foo() function so that it
is as follows.
fn main() {
    println!("Hello, world!");
}

fn foo() {
  println!("Hello Foo");
}
Note: We did NOT see the bar(), foobar(), or car() functions.
This is because those patches are above our current location in the stack.
Which is exactly what we want.
Then we stage the change with git add and amend the patch with git commit --amend as we normally would. After amending the patch if we look at the gps ls output we see the following.

Here we can see the amended version of Add foo() function patch, but we can
also see that the rest of the patches aren’t stacked on top of it yet. This is
because we are still in the middle of the rebase.
Finish the Rebase
To replay the rest of the patches on top of the new patch(es) we just created we simply run the following.
git rebase --continue
Potential Conflicts
Depending on the changes you made you may run into conflicts that you created with the patches above. This is actually exactly what you want because if you made the change in the correct location in your stack then you want it to force you to integrate the above patches with the new change.
In the case of our example there are no conflicts. If we check out our Patch Stack it will now look as follows.

And we have successfully amended a patch in the middle of our stack!
Combine multiple patches
Sometimes you decide that two separate patches should really be collapsed into one to make a complete logical change.
TL;DR
For those who just need a quick reference as a reminder you can do the following.
gps rebase- do an interactive rebase of the patch stack- mark the patch(es) you want to combine up into another patch with
squashorfixupin the interactive rebase buffer - save the buffer and quit the editor
WalkThrough
The gps rebase command is a convenience function that really runs an
interactive rebase of the stack on top of it’s associated upstream, e.g.
git rebase -i --onto origin/main origin/main main.
So to understanding how to combine patches with this command is really simply learning how to combine commits using git’s interactive rebase.
Initial State
Let’s start with the following patch stack (gps ls).

Mark Patches
Let’s say that we need to combine the “Add function A” and “Add function B” patches together to make a logical patch.
To do this we start by running gps rebase to kick off the interactive rebase.
It presents the following in our configured editor.
pick 340a171 Add function A
pick 00e9082 Add function B
pick c1b3634 Add function C

# Rebase 016b6ec..c1b3634 onto 016b6ec (3 commands)
#
# Commands:
# p, pick <commit> = use commit
# r, reword <commit> = use commit, but edit the commit message
# e, edit <commit> = use commit, but stop for amending
# s, squash <commit> = use commit, but meld into previous commit
# f, fixup [-C | -c] <commit> = like "squash" but keep only the previous
#                    commit's log message, unless -C is used, in which case
#                    keep only this commit's message; -c is same as -C but
#                    opens the editor
# x, exec <command> = run command (the rest of the line) using shell
# b, break = stop here (continue rebase later with 'git rebase --continue')
# d, drop <commit> = remove commit
# l, label <label> = label current HEAD with a name
# t, reset <label> = reset HEAD to a label
# m, merge [-C <commit> | -c <commit>] <label> [# <oneline>]
#         create a merge commit using the original merge commit's
#         message (or the oneline, if no original merge commit was
#         specified); use -c <commit> to reword the commit message
# u, update-ref <ref> = track a placeholder for the <ref> to be updated
#                       to this position in the new commits. The <ref> is
#                       updated at the end of the rebase
#
# These lines can be re-ordered; they are executed from top to bottom.
#
# If you remove a line here THAT COMMIT WILL BE LOST.
#
# However, if you remove everything, the rebase will be aborted.
#
To combine a patch with the patch above it, we simply mark it for squash or
fixup instead of its default pick. If you forget the marking you can
always reference the comment Git includes in the interactive rebase buffer. So
in this case we mark the “Add function B” patch with squash as follows.
Note: The stack is inverted when presented in an interactive rebase. So the bottom most commit on the stack is actually the top most commit. This can be confusing until you get used to it.
pick 340a171 Add function A
squash 00e9082 Add function B
pick c1b3634 Add function C

# Rebase 016b6ec..c1b3634 onto 016b6ec (3 commands)
#
# Commands:
# p, pick <commit> = use commit
# r, reword <commit> = use commit, but edit the commit message
# e, edit <commit> = use commit, but stop for amending
# s, squash <commit> = use commit, but meld into previous commit
# f, fixup [-C | -c] <commit> = like "squash" but keep only the previous
#                    commit's log message, unless -C is used, in which case
#                    keep only this commit's message; -c is same as -C but
#                    opens the editor
# x, exec <command> = run command (the rest of the line) using shell
# b, break = stop here (continue rebase later with 'git rebase --continue')
# d, drop <commit> = remove commit
# l, label <label> = label current HEAD with a name
# t, reset <label> = reset HEAD to a label
# m, merge [-C <commit> | -c <commit>] <label> [# <oneline>]
#         create a merge commit using the original merge commit's
#         message (or the oneline, if no original merge commit was
#         specified); use -c <commit> to reword the commit message
# u, update-ref <ref> = track a placeholder for the <ref> to be updated
#                       to this position in the new commits. The <ref> is
#                       updated at the end of the rebase
#
# These lines can be re-ordered; they are executed from top to bottom.
#
# If you remove a line here THAT COMMIT WILL BE LOST.
#
# However, if you remove everything, the rebase will be aborted.
#
Squash vs. Fixup
Git’s interactive rebase provides two mechanisms of combining commits, squash
and fixup. Squash combines two commits and presents you with the combined
commit messages in the rebase. Fixup on the other hand combines two commits
while throwing away the commit message of the commit marked withe fixup.
Warning: You need to be careful when using fixup to make sure that you
aren’t accidentally throwing away a ps-id from the commit message that you
want to keep around.
Choose a ps-id
When you are combining patches you want to be aware that depending on what
state your patches are in, one, or the other, or both might have ps-id’s in
their commit message. The ps-id in the commit message is how Git Patch Stack
uniquely identifies patches and tracks and associates state to them.
If you are in a situation where only one of the patches involved has a ps-id
you will likely want to keep that ps-id in the resulting combined patch’s
commit message.
If you are in a situation where multiple patches involved have ps-id’s you
will have to select one ps-id to keep and use as the ps-id for the new
combined patch.
Confirm Rebase
We then save and quit the editor, and it combines the patches marked with
squash or fixup as part of the rebase. This leaves our patch stack as
follows (gps ls).

Exactly the state we wanted it to be in.
Split a patch up
When you first discover the importance of logically structured Git commits (a.k.a. patches), which is by the way a core fundamental expectation & design characteristic of Git and how it is intended to be used.
It naturally leads to the question, “How do I split a patch up into multiple patches?” This is crucial because I know I am not going to get this right the first try. Below I present a simple contrived example so that you can learn the mechanics and process of doing this, as the mechanics & process don’t change.
The other topic related to this which this guide does not cover is the process of taking code and splitting it up into logical chunks. This generally takes an understanding of the application architecture & the dependency relationship between the various elements.
So let’s get to it.
TL;DR
For those who just want a quick reminder reference here is the TL;DR. For those who need a bit more context and detail through the walk through read the sections below.
gps rebase- do an interactive rebase of the patch stack & mark the patch you want to split foredit, it will drop you out into the shell at that patchgit reset HEAD^- soft reset the patchgit add -p- stage just the parts you want in the first patchgit commit- create the first patchgit add -p- stage just the parts you want in the next patchgit commit- create the next patchgit rebase --continue- continue the rebase to play the other commits on top of the new commits you created
Initial State
For this example let’s assume that we have a Patch Stack that has the following patches.

As we can see from the first patch Add Readme Title, it adds the title to the
README.
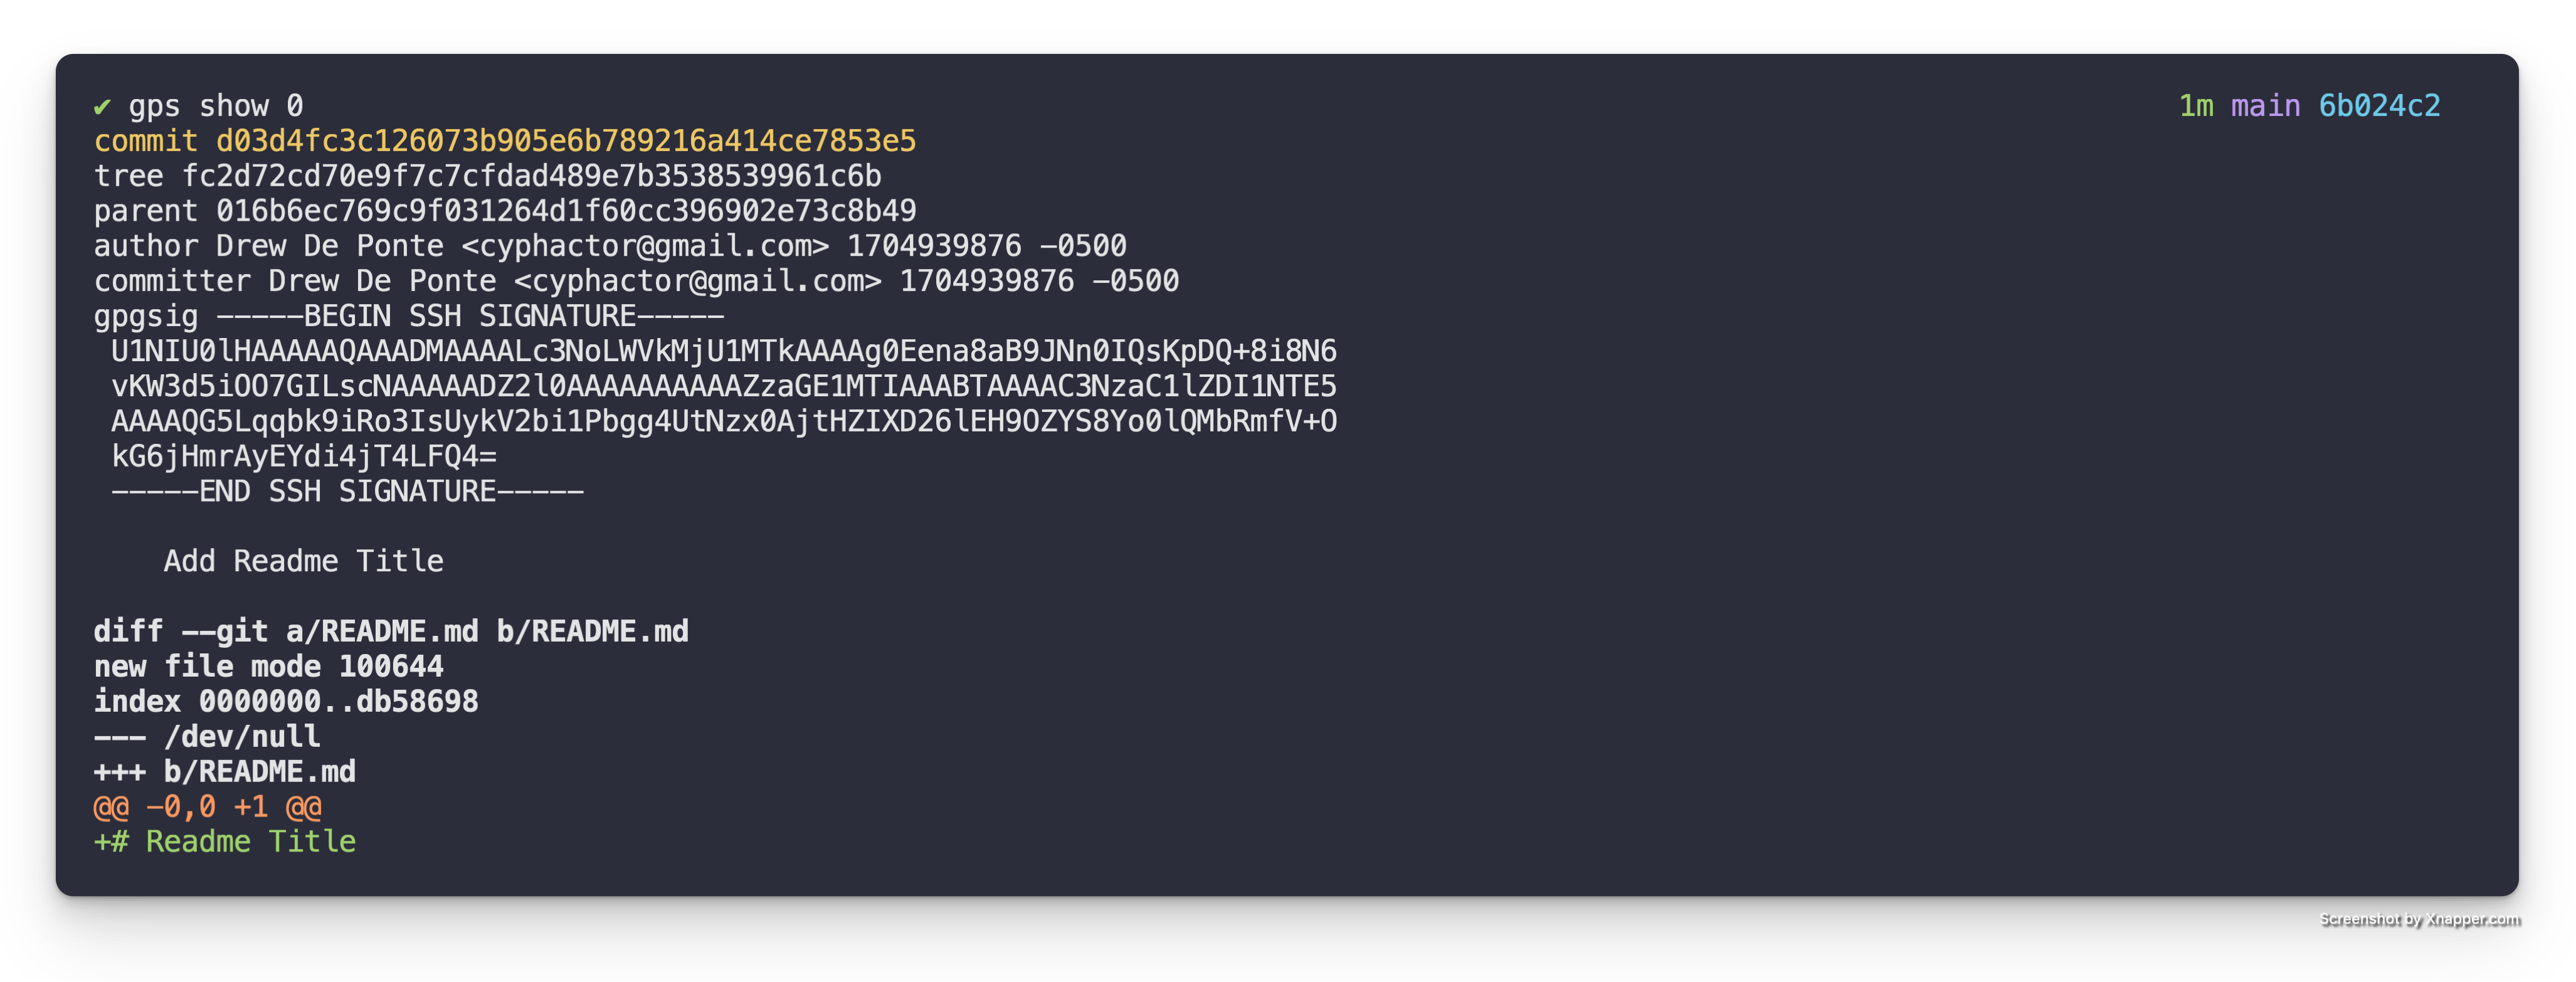
The second patch, Add README.md subtitle & description, adds the
subtitle and the description as seen in the diff below.
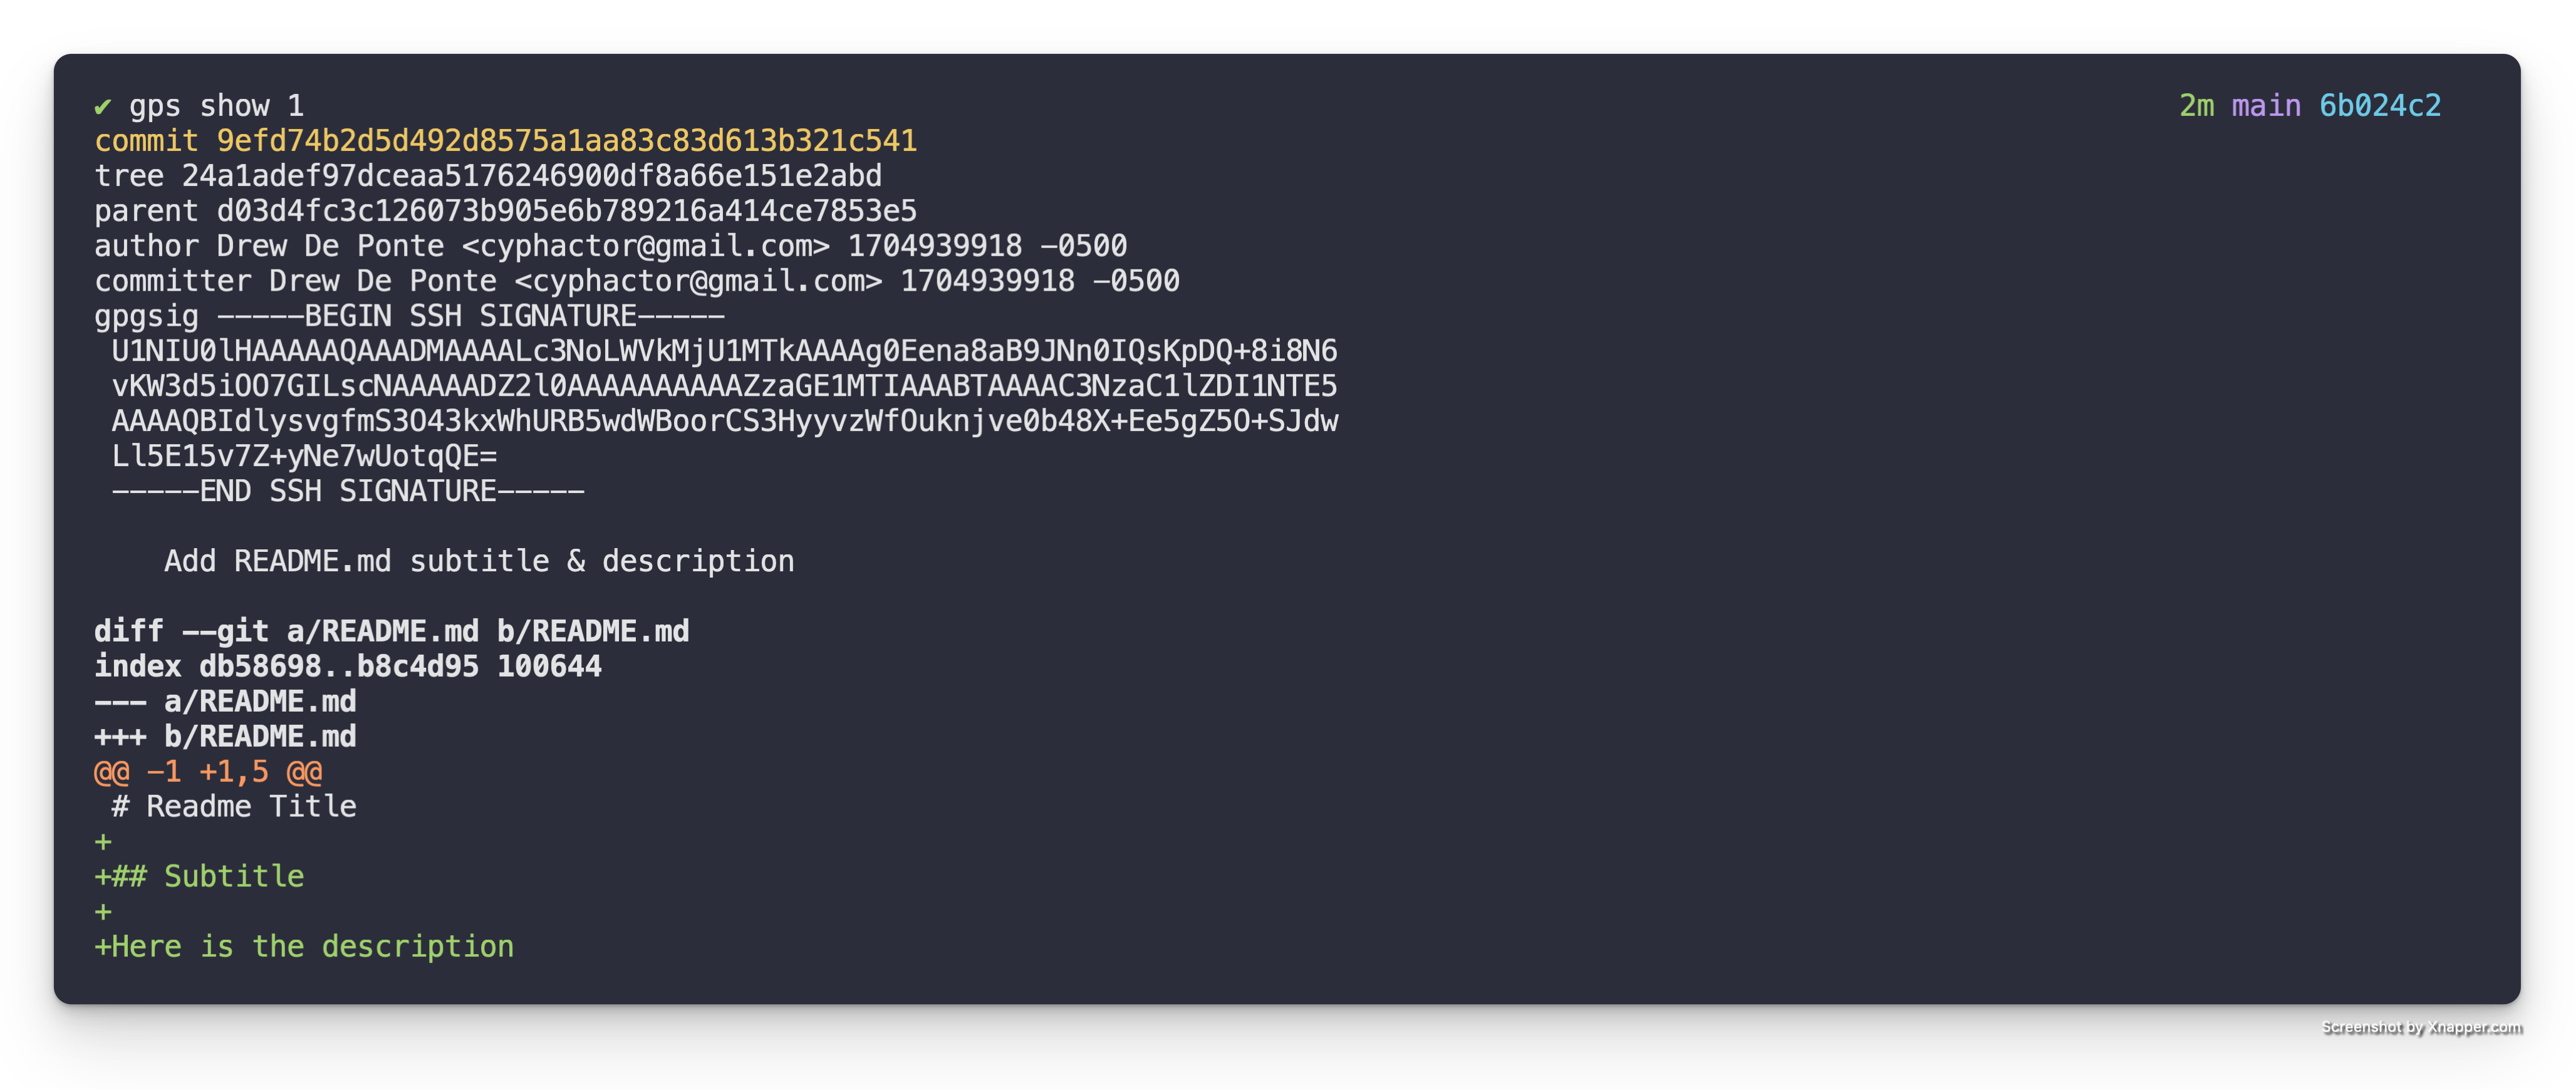
The third patch, Add first paragraph to README.md adds the first paragraph in
the diff below.
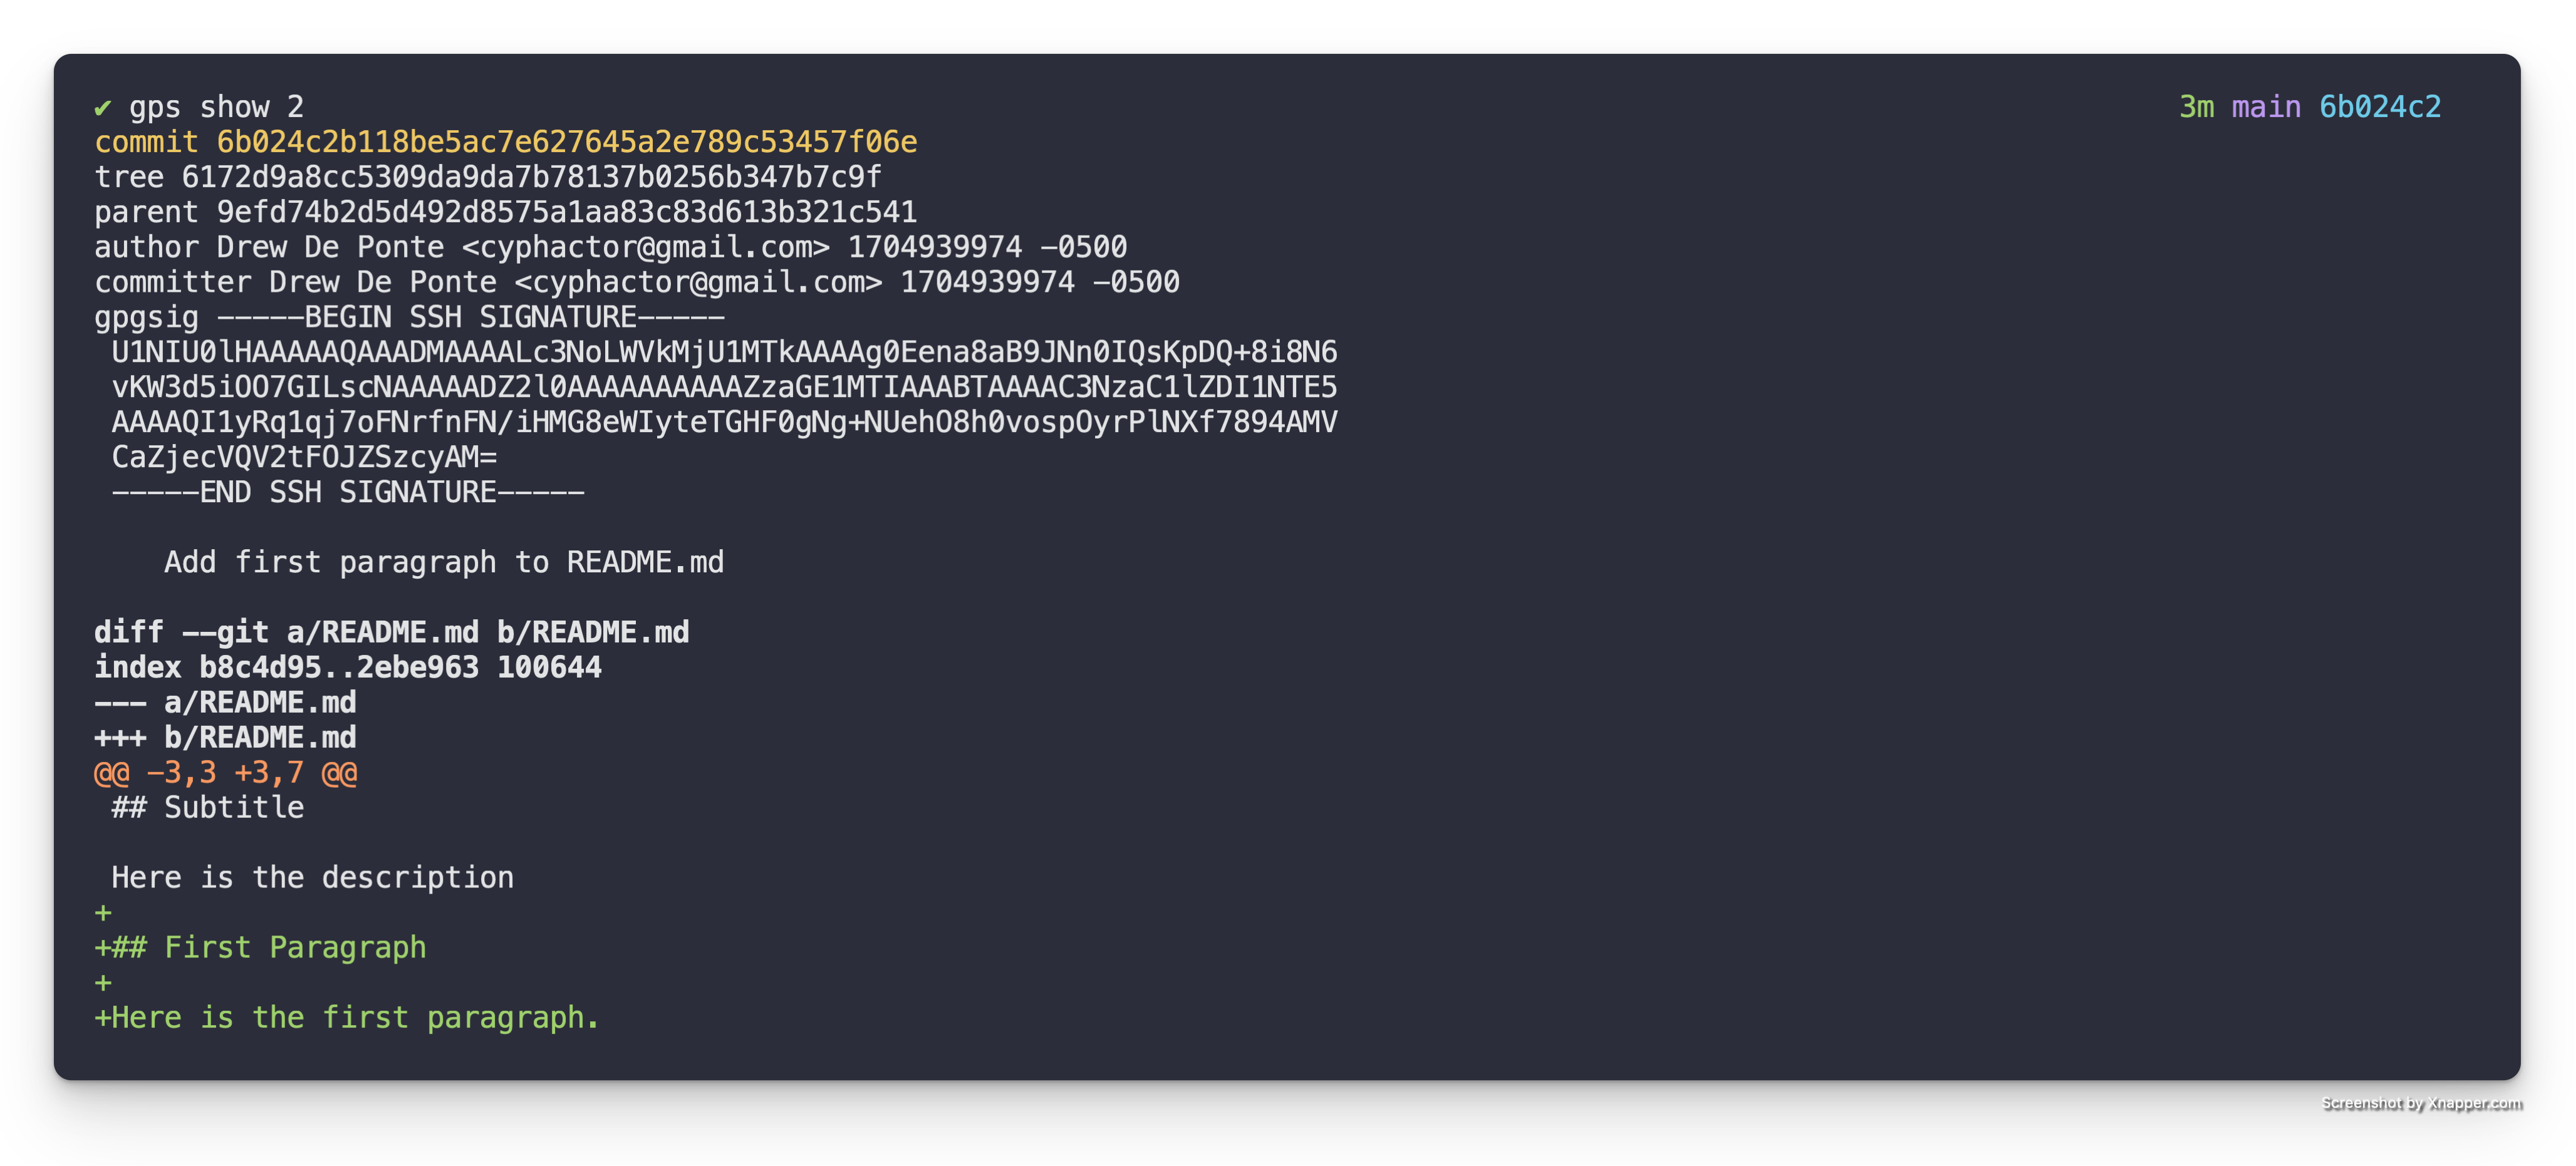
Non-Logically Structured Patch
Looking at the patch summaries & the diffs themselves we can see that the
second commit, Add README.md subtitle & description is actually
doing two logical things. First it is adding the subtitle. Secondly it is
adding the description to the README.
Instead of the above what we really wanted to have was one patch that adds the subtitle and a separate patch that adds the description as two isolated logical chunks.
Edit Mode
To accomplish this we need to utilize an interactive rebase to enter “edit” mode in the correct place in the Patch Stack. In this particular case we want to rebase our Patch Stack with the following.
gps rebase
This will bring up the following in your editor.
pick d03d4fc Add Readme Title
pick 9efd74b Add README.md subtitle & description
pick 6b024c2 Add first paragraph to README.md

# Rebase 016b6ec..6b024c2 onto 016b6ec (3 commands)
#
# Commands:
# p, pick <commit> = use commit
# r, reword <commit> = use commit, but edit the commit message
# e, edit <commit> = use commit, but stop for amending
# s, squash <commit> = use commit, but meld into previous commit
# f, fixup [-C | -c] <commit> = like "squash" but keep only the previous
#                    commit's log message, unless -C is used, in which case
#                    keep only this commit's message; -c is same as -C but
#                    opens the editor
# x, exec <command> = run command (the rest of the line) using shell
# b, break = stop here (continue rebase later with 'git rebase --continue')
# d, drop <commit> = remove commit
# l, label <label> = label current HEAD with a name
# t, reset <label> = reset HEAD to a label
# m, merge [-C <commit> | -c <commit>] <label> [# <oneline>]
#         create a merge commit using the original merge commit's
#         message (or the oneline, if no original merge commit was
#         specified); use -c <commit> to reword the commit message
# u, update-ref <ref> = track a placeholder for the <ref> to be updated
#                       to this position in the new commits. The <ref> is
#                       updated at the end of the rebase
#
# These lines can be re-ordered; they are executed from top to bottom.
#
# If you remove a line here THAT COMMIT WILL BE LOST.
#
# However, if you remove everything, the rebase will be aborted.
#
In the interactive rebase buffer we can change the action for the middle patch
to edit so it as follows.
pick d03d4fc Add Readme Title
edit 9efd74b Add README.md subtitle & description
pick 6b024c2 Add first paragraph to README.md

# Rebase 016b6ec..6b024c2 onto 016b6ec (3 commands)
#
# Commands:
# p, pick <commit> = use commit
# r, reword <commit> = use commit, but edit the commit message
# e, edit <commit> = use commit, but stop for amending
# s, squash <commit> = use commit, but meld into previous commit
# f, fixup [-C | -c] <commit> = like "squash" but keep only the previous
#                    commit's log message, unless -C is used, in which case
#                    keep only this commit's message; -c is same as -C but
#                    opens the editor
# x, exec <command> = run command (the rest of the line) using shell
# b, break = stop here (continue rebase later with 'git rebase --continue')
# d, drop <commit> = remove commit
# l, label <label> = label current HEAD with a name
# t, reset <label> = reset HEAD to a label
# m, merge [-C <commit> | -c <commit>] <label> [# <oneline>]
#         create a merge commit using the original merge commit's
#         message (or the oneline, if no original merge commit was
#         specified); use -c <commit> to reword the commit message
# u, update-ref <ref> = track a placeholder for the <ref> to be updated
#                       to this position in the new commits. The <ref> is
#                       updated at the end of the rebase
#
# These lines can be re-ordered; they are executed from top to bottom.
#
# If you remove a line here THAT COMMIT WILL BE LOST.
#
# However, if you remove everything, the rebase will be aborted.
#
When you save & quit the editor it will run the specified interactive rebase
commands. In this case pick (meaning keep) the first patch and then stop on
the second patch allowing for editing because we specified, edit. When it
does this, it will drop you back to the console with a message similar to the
following:
Stopped at 9efd74b...  Add README.md subtitle & description
You can amend the commit now, with

  git commit --amend '-S'

Once you are satisfied with your changes, run

  git rebase --continue
Split the Patch
We want to split the changes currently held in this patch into multiple patches. To do this we need to reset the patch that we are currently on and then partially stage the changes back & create a patch, then stage the other part and create another patch, and then continue the rebase.
So first we have to reset just the patch that we are checked out on and we want to do a soft reset. So we do the following:
git reset HEAD^
Now if we run git diff to see the now local unstaged changes we see the
following.
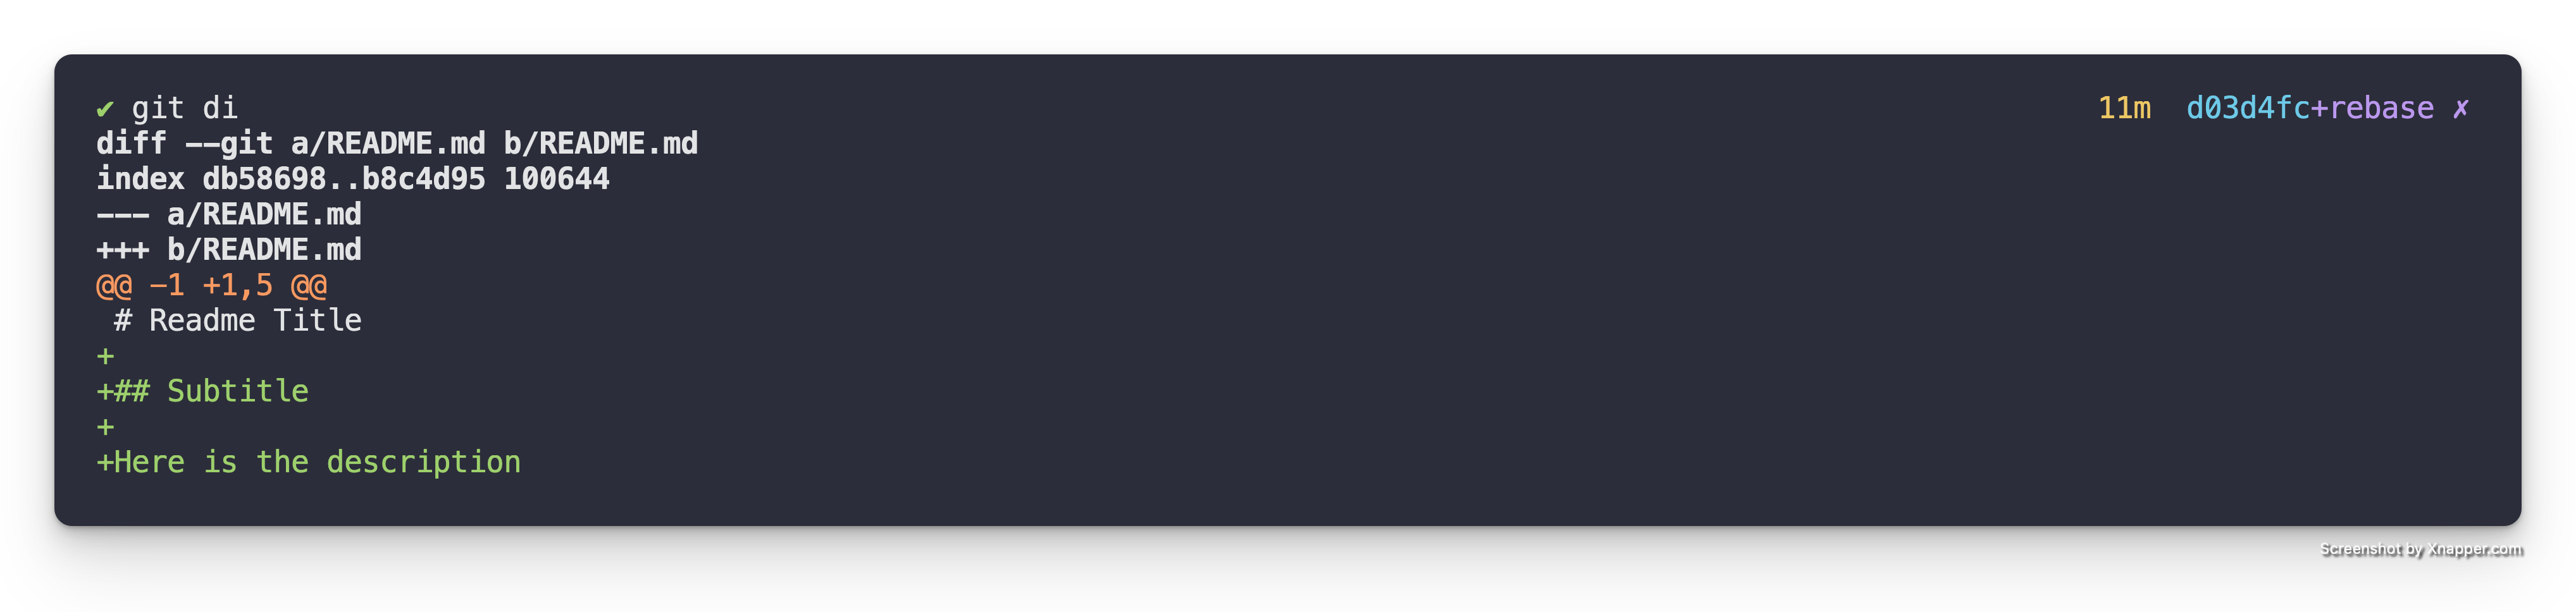
As we can see we now have the changes that add both the subtitle & the description locally.
So we first want to stage a patch with just the ## Subtitle portion. To do
this we need to use git add -p README.md to do a partial stage of the README
files changes to just stage the ## Subtitle portion. See this post, git add
patch won’t split for
details on how to accomplish this. This should leave us with the following.
+
+Description of the README
If you run git status to check on things at this point it should look like
this.
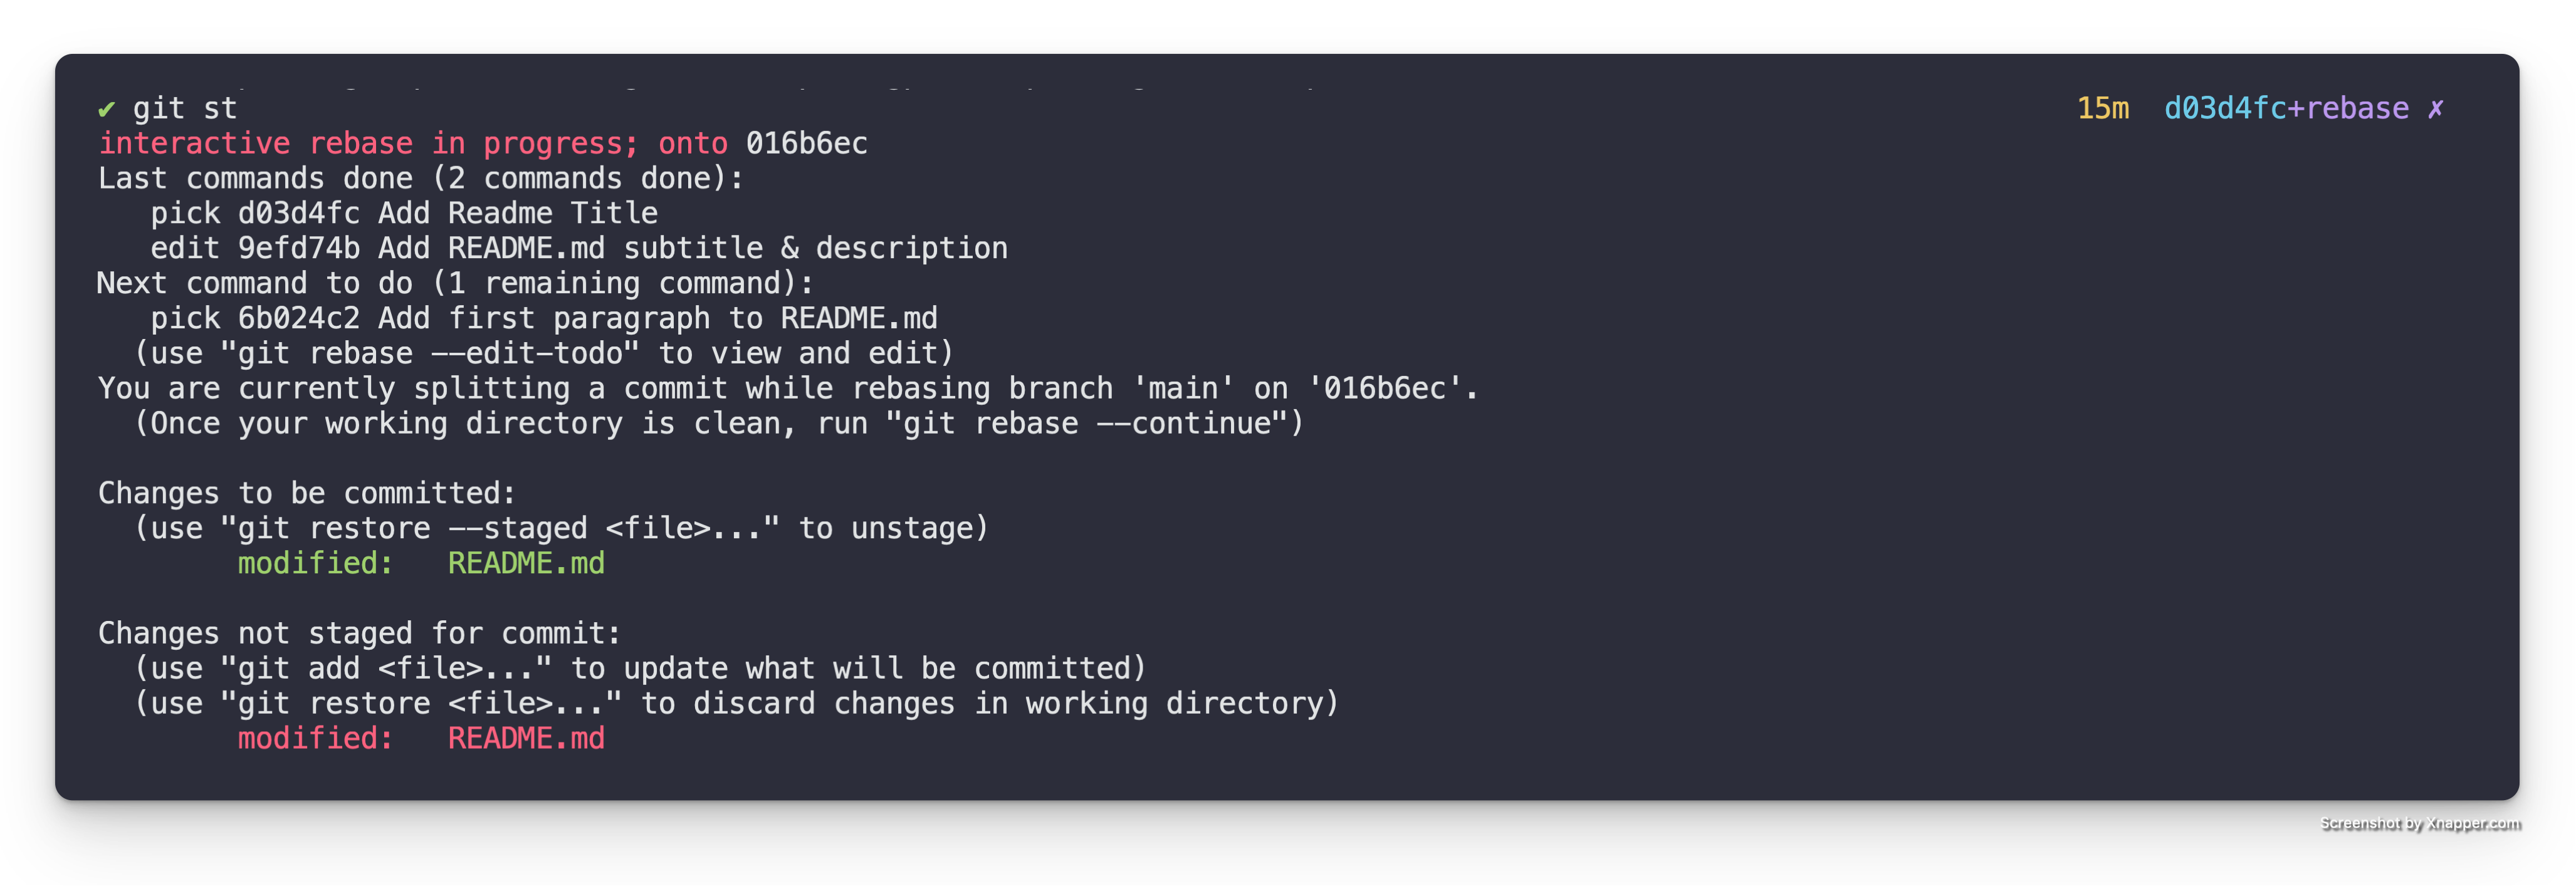
If we specifically check out the staged changes with git diff --staged we get
the following.

This is exactly what we wanted. But let’s make sure the unstaged changes also
represent what we want by running git diff.
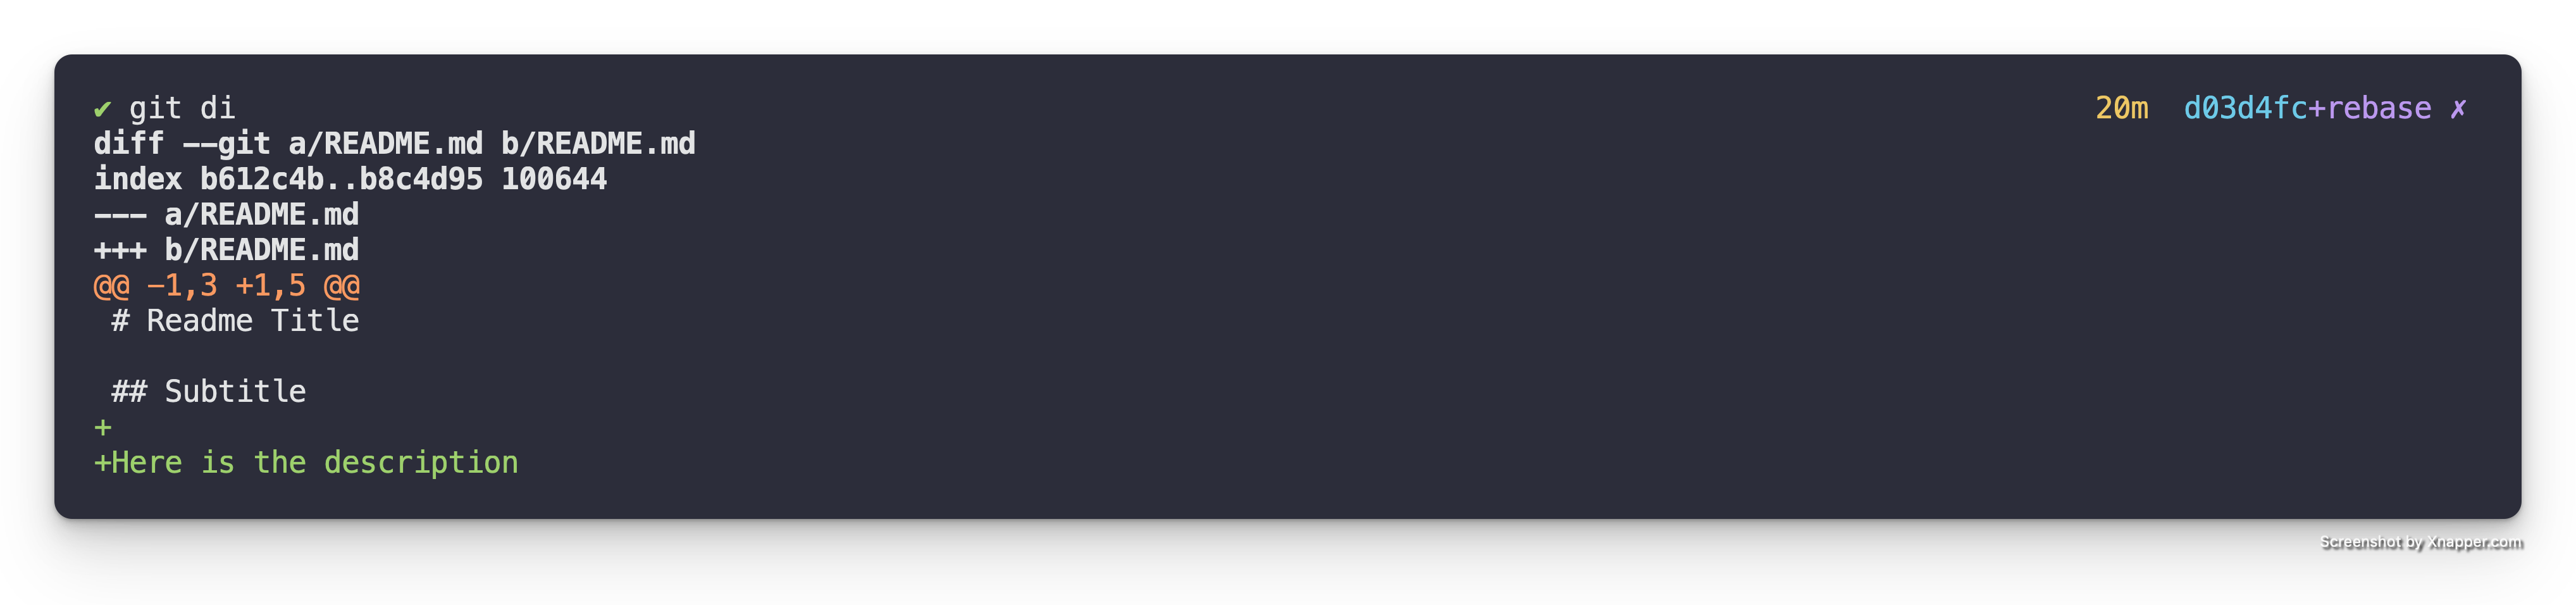
Yep looks like they do. So now we just need to create the first of the two patches that will replace the patch we marked for edit. This can be done as follows.
git commit
When it opens the editor for the message we can give it a summary of
Add subtitle to README.
From there we can stage the rest of the changes with git add README.md and
create the second patch with the following.
git commit
When it opens the editor for the message we can give it a summary of
Add description to README.
Finish the Rebase
Now that the changes have been split up into separate patches like we wanted we now need to instruct it to finish the interactive rebase that we started with the edit. This is done as follows.
git rebase --continue
Once it is complete if we check out our Patch Stack it will look as follows.

Exactly what we wanted!
Request Review of a patch
TL;DR
gps ls- list out patches in patch stack to the patch index you want to request review ofgps rr <patch-index>- request review of the patch identified by the given patch-index
WalkThrough
Get Patch Index
Before we can request review for a patch. We have to identify which patch we
want to request review of and get its associated index. The best way to do this
is to simply run gps ls to list out the patches in the stack with their
associated indices and statuses. An example of this looks as follows.

Request Review
In the example above let’s say we wanted to request review of the “Add function
A & function B” patch. We look and it’s associated index is 0. Therefore, to
request review of this patch we simply run the following.
gps rr 0
The above kicks off the request review process for the “Add function A & function B” patch.
Isolation Verification
The first step in the request review process is to run the isolation verification if the configuration for it is enabled. For specifics on the configuration checkout the Configuration chapter.
Isolation Verification is a process where a temporary branch is created that is based on the upstream base and the patch is cherry-picked into this branch. This verifies that at least from a Git perspective the patch is independent enough to successfully be cherry-picked on top of the upstream base.
This however does not verify the patch is truly independent because it doesn’t
address code dependencies. To address this the Isolation Verification process
supports the isolate_post_checkout hook. This is a hook that if present gets
executed after cherry-picking the patch into the temporary branch and checking
that branch out. It allows you to provide an isolate_post_checkout hook
script that can run linting, test suite, build process, etc. which can help
verify that your patch is actually independent. Details on the hook can be
found in the Hooks chapter.
Request Review Branch Creation & Sync
Assuming that the isolation verification is successful it then moves onto
creating the request review branch (e.g. ps/rr/some-patch-summary) based on
the upstream base, cherry-picking the patch into it, and then syncing that
branch with the remote.
If the isolation verification fails the command exits aborting the request review process.
Request Review Post Sync Hook
After syncing the request review branch if the request_review_post_sync hook
is configured it will be executed. To find details about this hook and others
check out the Hooks chapter.
This hook is commonly used to automate the creation of pull requests or create a
patch email and send it to a mailing list so that all you have to do is a gps rr <patch-index> and it will take care of the entirety of requesting review of
that patch.
Update a previously Requested Review
Generally when you request review of a patch you end up getting some feedback and need to modify the patch. This is done using all the techniques described in the other guides. Once the patch has been updated you want to update the request review with the new version of the patch. This is done by just requesting review of the patch again as follows.
gps rr <patch-index>
Thats it!
Absorb Changes
TL;DR
- discover changes that were pushed up to your review branch
git cherry-pick <pushed-up-commit-sha>- cherry-pick the changes down into your patch stackgps rebasew/fixup/squash- absorb the changegps rr- re-request review of updated patch(es)
WalkThrough
In this example let’s assume that we have a simple patch stack consisting of a
single patch. If we run gps ls it looks as follows because we have already
requested review of our patch.

Discover Changes
We soon discover that one of the reviewers of our pull request has pushed changes up to review branch. This often happens when the reviewer is trying to give you an example or when they are trying to help you out with some changes.
We don’t want just ignore their changes and do a gps rr again as we would be
throwing their changes away. We also don’t want to manually implement what they
have already done as that is more work.
Cherry-Pick Changes
So we git cherry-pick 5bca34 to cherry-pick the change down into our patch
stack. Now if we run gps ls our patch stack looks as follows.

Absorb Changes
Now we simply need to absorb the change in some way. It could be that it
logically fits with our patch and therefore we fixup/squash it with our patch
using gps rebase.
Or, it could be that it makes sense as a separate patch.
Re-request Review
If we did the fixup/squash approach we simply need to re-request review of
our now updated patch with gps rr.
We could also have decided to keep a separate request review for it
individually with gps rr and gps rr our originally patch, adding a comment
on the PR to explicitly communicate the decision to keep them separate.
The last option would be that we chose to keep them separate but as part of a
patch series. In which case we would use the gps rr -n foo 0-1 command to
re-request review.
That is it! We just absorbed the change that was pushed up.
Integrate a patch
TL;DR
gps ls- list out patches in patch stack to the patch index you want to integrategps int <patch-index>- integrate the patch identified by the given patch-index
WalkThrough
Get Patch Index
Before we can integrate a patch. We have to identify which patch we want to
integrate and get its associated index. The best way to do this is to simply
run gps ls to list out the patches in the stack with their associated indices
and statuses. An example of this looks as follows.

Integrate
In the example above lets say we wanted to integrate the Add foo() function
patch. We look, and it’s associated index is 0 and then run the following to
trigger the integration.
gps int 0
Safety Check
//     x figure out associated branch
//     x verify has associated branch, exit with error
//     x check to make sure patches match between stack & remote
//     - execute hook to verify PR approval & CI status
If we tried to integrate this patch with gps int 0 it would fail because as a
safety precaution it makes sure that the patch has an associated branch and
that the patch in the stack and the one in the branch & remote branch match. It
also runs the integrate_verify hook to make sure the integration should go
forward.
This can be overridden with the -f option as gps int -f 0.
Isolation Verification
The first step in the integration process is to run the isolation verification if the configuration for it is enabled. For specifics on the configuration checkout the Configuration chapter.
Isolation Verification is a process where a temporary branch is created that is based on the upstream base and the patch is cherry-picked into this branch. This verifies that at least from a Git perspective the patch is independent enough to successfully be cherry-picked on top of the upstream base.
This however does not verify the patch is truly independent because it doesn’t
address code dependencies. To address this the Isolation Verification process
supports the isolate_post_checkout hook. This is a hook that if present gets
executed after cherry-picking the patch into the temporary branch and checking
that branch out. It allows you to provide a isolate_post_checkout hook
script that can run linting, test suite, build process, etc. which can help
verify that your patch is actually independent. Details on the hook can be
found in the Hooks chapter.
Prompt for Reassurance
Assuming the isolation verification was successful it then moves onto prompting the user for reassurance that they want to integrate the patch. This presents the details for the patch including the diff and then prompts the user to enter yes/no indicating if they want to continue with the integration.
Note: This feature can be disabled/enabled via the configuration. More details can be found in the Configuration chapter.
Patches Differ Check
If the user responded yes to the prompt for reassurance or has it disabled
the next step in the integrate process is to check if the diff of the patch in
the patch stack matches the diff of the patch on the remote branch. This is a
precautionary check to make sure you don’t accidentally integrate a patch that
is different than you think.
Note: gps ls will show you if your patches differ.
Actually Integrate
Assuming the above checks pass the next step in the integration process is
doing the actual integration of the patch into upstream. At a Git level this is
done similar to the following if your stack was on main.
git push origin origin/ps/rr/whatever-branch:main
Cleanup Branches
Then it cleans up the local and remote branches that were utilized during the
request review and integration process. This branch cleanup can be prevented by
passing the -k or --keep-branch option to the gps int command.
List
Now that the integration is complete we can run gps ls to see the state of things again.
You might have noticed that it is exactly the same as the initial gps ls
output. This is because Git itself has no way of knowing yet that the
integration has happened.
So if you do a gps pull to pull down the latest state from upstream and run
gps ls again. You will notice that the patch that was integrated is no longer
in your stack. This is because Git detected it was integrated and removed it
from the stack for you.
Note: There is a configuration option for the integrate command that when
enabled will cause the integrate command to run a gps pull for you when it
was successful. This will make it so this awkward state where you still have
the integrated patch in your stack isn’t observable anymore. More details can
be found in the Configuration chapter.
That is how a patch is integrated.
Methodology
TL;DR
Modern Git workflows optimize for features, but best practices optimize for integration, review quality, and history.
The Git Patch Stack Methodology replaces feature-centric pull requests with small, architectural patches stacked directly on top of mainline. Each patch is:
- Small and reviewable
- Continuously rebased and integrated
- Architecturally meaningful
- Historically valuable
Development happens outside-in, while review and integration happen inside-out—one patch at a time. The result is better reviews, fewer conflicts, cleaner history, and faster integration without abandoning pull requests.
Git Patch Stack Methodology
To truly understand the Git Patch Stack Methodology, it helps to start with how software changes are typically made.
At a high level, most changes fall into one of two categories:
- Large changes — new features or major system modifications
- Small changes — bug fixes, copy updates, refactors, and minor improvements
On the surface, this works fine if you don’t care much about peer review quality, conflict reduction, architectural clarity, or the long‑term historical value of your code. In that world, all you need is a feature branch, following the workflow popularized by platforms like GitHub and Bitbucket.
At best, a pull request created this way corresponds to a single, coherent change from the diagram above. At worst, it looks like a feature branch full of loosely related commits—snapshots of half‑finished thoughts—with little structure or narrative. The commits don’t clearly explain what changed, why it changed, or how the changes relate to one another. Unfortunately, this pattern is extremely common.
Best Practices
So what should we actually be aiming for?
Small Pull Requests
One widely accepted best practice is to keep pull requests small. The primary reason is to enable high‑quality peer review.
When a pull request is large and overwhelming, reviewers tend to skim it and respond with a quick LGTM. We’ve all done it. The result is a review that adds little value—often no more than what an automated linter could have caught.
Small pull requests, on the other hand, make it realistic for reviewers to:
- Understand the change in context
- Evaluate architectural decisions
- Reason carefully about correctness and edge cases
Continuous Integration
Another best practice is continuous integration—not the tooling (GitHub Actions, CircleCI, etc.), but the behavior.
Continuous integration means integrating changes into the mainline as quickly and as frequently as possible. Doing so:
- Dramatically reduces merge conflicts
- Makes conflicts easier to resolve when they do occur
- Narrows the scope of investigation when a bug is introduced
Small, frequent integrations keep the system stable and make failures easier to reason about.
Architecture & Historical Value
A third set of best practices concerns the long‑term readability and usefulness of your Git history. Ideally, each change should:
- Align with a specific architectural element
- Clearly describe what changed
- Explain why the change was necessary
- Indicate how the change was implemented
When these conditions are met, your Git history becomes a form of documentation. You can understand why the system evolved the way it did, not just what the final state looks like. Each commit becomes a small, logical step toward a larger goal—similar to showing your work in a math problem. This is often described as proof of work.
The Conflict
When you try to apply these best practices while relying primarily on feature branches, tensions quickly emerge.
Feature Branches vs. Continuous Integration
Branches exist to isolate work. Continuous integration exists to avoid isolation. By definition, the two concepts are in conflict.
Teams often try to work around this by rebasing feature branches or repeatedly merging mainline back into them. Rebasing adds cognitive and operational overhead. Merging mainline repeatedly results in tangled Git histories that are difficult to understand or reason about.
Feature Branches vs. Small Pull Requests
Feature branches typically bundle an entire feature into a single pull request. The result is often a massive PR that discourages careful review and encourages superficial approval.
Feature Branches vs. Historical Value
Finally, feature branches encourage developers to think in terms of features, not architectural changes. As a result, commit messages often lack clarity and historical usefulness. A feature is not an architectural unit; it is composed of many smaller architectural steps.
Resolving the Conflict
To better align with these best practices, we need a different mental model—one that emphasizes small, architectural changes and frequent integration.
Our goals are straightforward:
- Small Pull Requests — to enable meaningful peer review
- Continuous Integration — to reduce conflicts and integration pain
- Architectural & Historical Value — to preserve a readable, valuable history
The Patch
Let’s introduce a new unit of work: the patch.
A patch is a single, logical, architecturally meaningful change that provides historical value. This terminology is intentional—it echoes the original patch‑based workflows used in early open‑source development, and still used today by projects like Git and the Linux kernel.
Conceptually, a patch maps directly to a well‑formed Git commit.
Continuous Integration Without Feature Branches
Instead of developing long‑lived feature branches, we develop directly on top of mainline.
Local commits represent patches. As mainline advances, we continuously rebase our local patch stack on top of it. Git makes this easy:
[pull]
    rebase = true
With this configuration, git pull automatically rebases your local patches onto the latest mainline, surfacing conflicts early—when they’re small and easy to fix.
The Stack
Rarely do we create just one patch. More often, we create a stack of patches, each building on the one below it.
This stack lives locally on top of origin/main. Later patches can depend on earlier ones, which mirrors how real features are developed. Git’s interactive rebase allows us to:
- Reorder patches
- Edit them
- Split or squash them
- Drop them entirely
Work‑in‑progress commits can be marked with a WIP: prefix and refined over time until they’re ready for review.
Pull Requests as Patch Reviews
Pull requests still matter—they’re how we request review. But instead of representing features, they represent patches.
A simple workflow looks like this:
- Create a branch from
origin/mainnamed after the patch - Cherry‑pick the patch onto that branch
- Push the branch and open a pull request
This introduces some overhead, but it’s manageable—and automatable.
Independent vs. Dependent Patches
Independent patches can be reviewed and merged on their own.
Dependent patches require more care. If Patch B depends on Patch A, then Patch A must be reviewed and merged first. This encourages an inside‑out review order, even if development happens outside‑in.
In some cases, a patch series—a pull request containing multiple dependent patches—may be appropriate. This trades faster integration for convenience and should be used selectively.
Updating Pull Requests
When a reviewer requests changes, we don’t add new commits—we update the patch.
Using interactive rebase, we modify the original commit and force‑push the updated branch. The pull request stays focused on a single logical change, even as it evolves.
Tracking Patch Identity
Because rebasing changes commit hashes, we need a stable identifier. Each patch includes a UUID in its commit message:
ps-id: <uuid>
This allows tooling to track patches across rebases, branches, and pull requests—and to detect when a patch has diverged from its reviewed version.
Development: Outside‑In, Review: Inside‑Out
Patch stacks naturally reflect dependency structure: foundational changes sit at the bottom, higher‑level behavior at the top.
This pairs well with outside‑in development—starting from the system boundary and letting requirements drive lower‑level interfaces. Early patches may be incomplete or marked as WIP.
As inner layers solidify, outer patches are revisited and finalized. Review, however, happens inside‑out: dependencies first, consumers later.
This rhythm—develop outside‑in, review inside‑out—is the heart of the Git Patch Stack Methodology.
Let’s Talk
We love to chat especially about Git Patch Stack. To facilitate that we support getting ahold of us in a number of a different ways.
Diff Stacking
What is it in general?
Why not stack branches instead of patches?
Well there are two primary which I think are very important reasons to choose stacking patches over stacking branches.
- stacking patches removes a layer of abstraction simplifying how you think about things as well as how you do them
This simplification and constraint is actually more valuable than what you might think. The stacking of patches and having to deal with the concepts of patch dependence/independence is an impetus driving the developer to truly understand their application architecture and write patches in relation to it. This is why I would argue that stacking patches has a more natural alignment with the application architecture than stacking branches which are generally associated with features and not the application architecture.